Abstract
The mobile automation is becoming trending topic these days. There are new tools introducing in the market in order to make the iOS and Android automation hassle free and Appium is one of them.
In this tutorial, we will see how to setup Mac OSX for iOS automation using BDD tool [Cucumber], cloud testing service Saucelabs and Appium server.
Appium
Appium is a open source, cross platform test automation tool for the hybrid and native iOS, Andriod and FirefoxOS apps. In the simple term, appium is a server running in the background like Selenium server. The key benefit of the Appium
- It’s very easy to setup and on different platform.
- Can write tests in the language of your choice (Ruby, Python, Java, PHP, Node)
- Can still use Selenium Wbdriver JSON wire protocol
- Don’t need to re-compile Mobile app on different platform
You can read more about Appium on Appium-Github page.
Setting up Mac OSX for iOS Automation
Now that, we need to set up our Mac OSX for iOS automation with Cucumber and Appium. There are few tools we need to install in advance before we go ahead with the iOS automation, make sure you have met following requirements
- OS X 10.8.4 or later
- Xcode 4.6.3 or later
- Node and npm (brew install node) (Node must be >= v0.8)
Setting up Cucumber-Ruby environment
There is a nice blog post to setup Mac OXS with Ruby-ish tools [ Moncef’s blog.] Basically, you need to install following tools and services.
- Xcode with Command line Tools
- Various versions iOS Simulators. [ It comes with Xcode]
- Homebrew [Package Management ]
- Git
- RVM and Ruby gems
- Cucumber
Please follow the steps in the @monfresh ‘s blog and you will have the above tools installed in your Mac OSX. On top of that you need to install few other tools.
Install NPM
Install npm using HomeBrew
$ brew update ;\
  brew upgrade node ;\
  brew install node
This will install node.js package management system.
Install some node pakages
- Install Grunt
$ npm install -g grunt grunt-cli
- Install appium
$ npm install -g appium
- Install wd
$ npm install wd
You can follow steps in appium-ruby-console-osx to get everything setup for you.
Setting up Appium
You can install Appium with the following options:
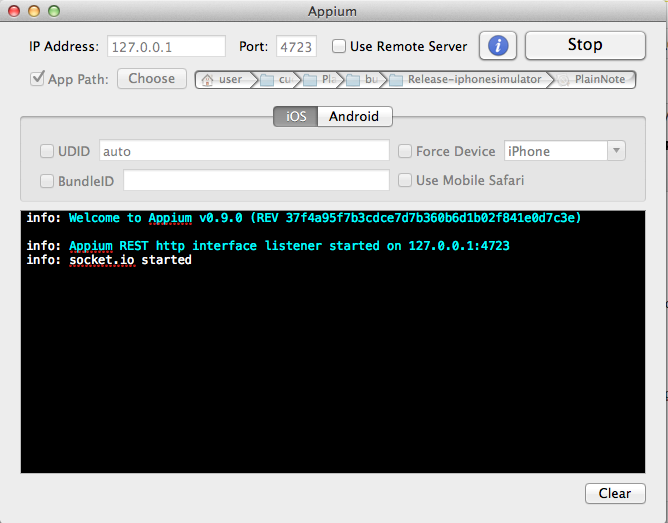
Option 1 : Appium OSX App
If you are on Mac OSX, I would strongly recommend to download Appium dmg.
You can then run app in your Mac and launch server by setting up port and providing suitable app path. Once you click on ‘Launch’ button, Appium will start like this
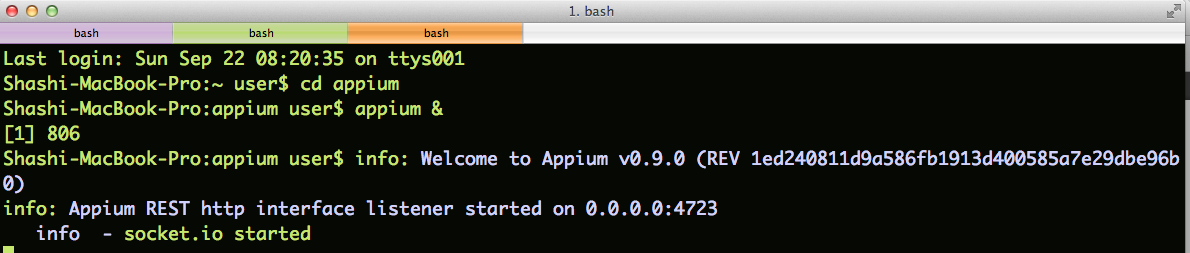
Option 2 : Run Appium using node
In order to use Appium with node, run following commands in your terminal
$ mkdir appium-test && cd appium-test
$ npm install -g appium  # might have to do this with sudo
$ sudo authorize_ios # enable developer use of iOS sim
$ npm install wd
$ appium &
OR you can clone appium repo
$ git clone git://github.com/appium/appium.git
$ cd appium
$ ./reset.sh --osx
$ sudo `which grunt` authorize  OR $ sudo authorize_ios
$ node server.js
Setting up Mobile App for Appium Tests
There are plenty of open-source mobile iPhone apps available here. I am using PlainNote App for this tutorial. Let’s create a project and setup our mobile app for Appium tests
$ mkdir cucumber-appium
$ cd cucumber-appium
$ git clone https://github.com/vkoser/PlainNote
$ cd PlainNote
Now, you need to compile your app by running
$ xcodebuild -sdk iphonesimulator6.0
This creates a “build/Release-iphonesimulator” directory in your Xcode project that contains the “PlainNote.app” package that you’ll need to communicate with the Appium server.
$ ls
AppStoreIcon.png       MainWindow.xib         PlainNote_Prefix.pch   build
Classes                NotesList.plist        README                 index.html
Icon.png               PlainNote-Info.plist   RootViewController.xib main.m
LICENSE                PlainNote.xcodeproj    Settings.bundle
$ cd build/Release-iphonesimulator/
$ ls
PlainNote.app      PlainNote.app.dSYM
We need to setup this app with our Appium app. You can see the image above which shows that we have setup PlainNote app with Appium
Using Appium Inspector
Appium App on OSX is very handy to record and playback tests for your iOS app. You can launch ‘Appium Inspector’ by clicking on ‘i’ icon. Appium Inspector can find elements and perform actions on it. You can record and playback tests using Ruby, Python, Java, node etc etc.
Watch this video Demo
Setting up Cucumber and Appium
Let’s create Cucumber project to run our iOS automated tests using Appium. We have already created ‘cucumber-appium’ directory above, we will set up cucumber project there. We need to make sure that, we are using ruby 1.9.3
$ cd cucumber-appium
$ rvm install 1.9.3
$ rvm use 1.9.3
- Create Gemfile
We need Gemfile in order to specify all our dependencies
$ cd cucumber-appium
$ vim Gemfile
Now insert following dependencies into the Gemfile
source "https://www.rubygems.org"

gem "rest-client"
gem "rspec"
gem "selenium-webdriver"
gem "cucumber"
gem "rspec-expectations"
Now we need to install bundle to download all dependencies
$ bundle install
This will create ‘Gemfile.lock’ file.
- Create Feature File
Now, we will write a feature file using Given When Then format. The feature file is written using Gherkin Domain Specific Language.
Let’s create ‘features/plain_note.feature‘ file.
$ vim features/plain_note.feature
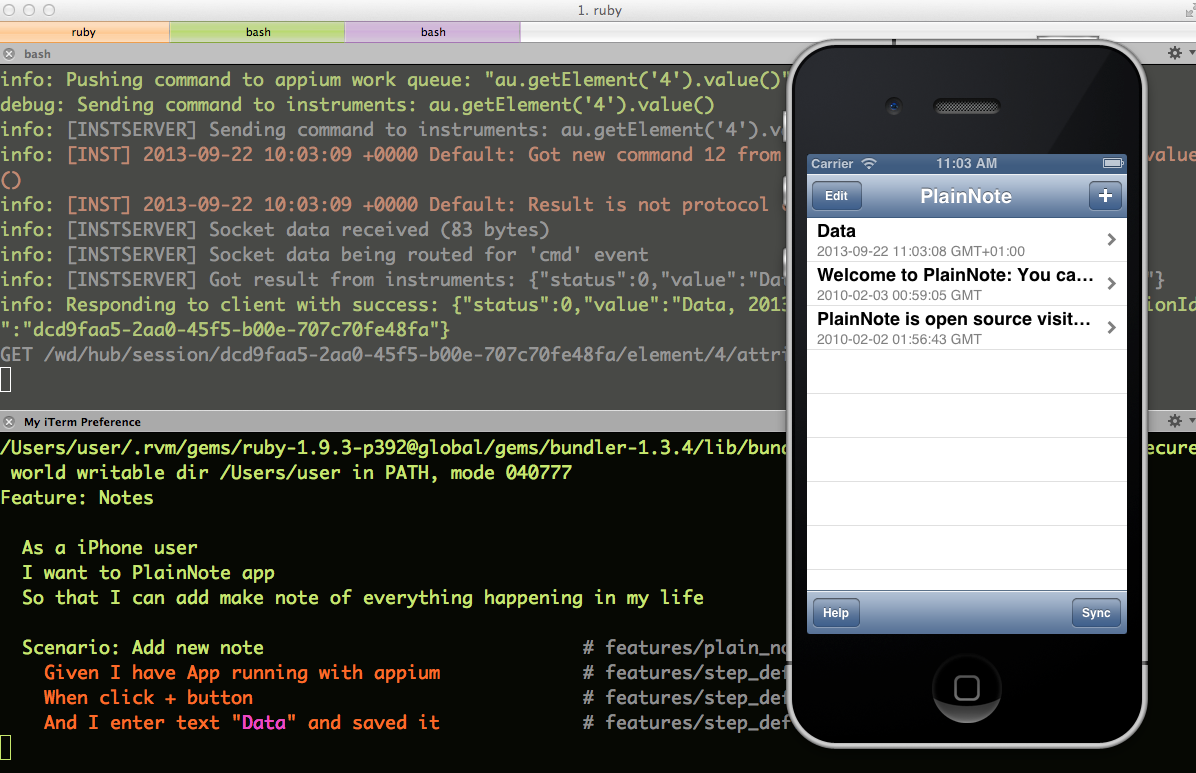
PlainNote app feature will look something like this
Feature: Notes
  As a iPhone user
  I want to PlainNote app
  So that I can make note of everything happening in my life

Scenario: Add new note
  Given I have App running with appium
  When click + button
  And I enter text "Data" and saved it
  Then I should see "Data" note added on home page
This feature is self explanatory, we are going to add new note and make sure it displayed on Home page.
- Setup Cucumber Environment
Let’s create ‘features/support/env.rb‘ where we can put our support code.
$ vim features/support/env.rb
Insert following code in the file.
require 'rspec/expectations'
require 'selenium-webdriver'

APP_PATH = '/../../PlainNote/build/Release-iphonesimulator/PlainNote.app'

def capabilities
  {
    'browserName' => 'iOS',
    'platform' => 'Mac',
    'version' => '6.0',
    'app' => absolute_app_path
  }
end

def absolute_app_path
  File.join(File.dirname(__FILE__), APP_PATH)
end

def server_url
  "http://127.0.0.1:4723/wd/hub"
end

def selenium
  @driver ||= Selenium::WebDriver.for(:remote, :desired_capabilities => capabilities, :url => server_url)
end

After { @driver.quit }
Now that, we have specified APP_PATH and defined server url where our Appium server is running. We have also created ‘selenium’ driver with all required desired capabilities. We will using ‘selenium’ object in our step_definition
- Write Step definitions using Selenium-Webdriver JSON Wire Protocol
At this point if you run ‘bundle exec cucumber’ command it will tell you steps that are not implemented yet. We need to implement these step definitions using Selenium-Webdriver JSON Wire Protocol for Appium. Now , we will create step definition file and implement it
$ vim features/step_definitions/plain_note.rb
Now add these step definitions to the file.
Given(/^I have App running with appium$/) do
 # Make sure you have started appium server
end

When(/^click \+ button$/) do
  selenium.find_element(:name, "Add").click
end

When(/^I enter text "(.*?)" and saved it$/) do |data|

selenium.find_element(:xpath, "//window[1]/scrollview[1]/textview[1]").send_keys data
selenium.find_element(:name, "Done").click
selenium.find_element(:name, "Save").click
end

Then(/^I should see "(.*?)" note added on home page$/) do |text|
note = selenium.find_element(:xpath,  "//window[1]/tableview[1]/cell[1]/text[1]")
note.attribute("value").should match text
end
Now We are done with all steps now start appium server and run
bundle exec cucumber features/plain_note.feature
You will see that application is launched with Xcode performing all the actions on Mobile app


You will see all the steps passed.
$ bundle exec cucumber
/Users/user/.rvm/gems/ruby-1.9.3-p392@global/gems/bundler-1.3.4/lib/bundler/runtime.rb:216: warning: Insecure world writable dir /Users/user in PATH, mode 040777
/Users/user/.rvm/gems/ruby-1.9.3-p392@global/gems/bundler-1.3.4/lib/bundler/runtime.rb:216: warning: Insecure world writable dir /Users/user in PATH, mode 040777
Feature: Notes

  As a iPhone user
  I want to PlainNote app
  So that I can add make note of everything happening in my life

  Scenario: Add new note                             # features/plain_note.feature:7
    Given I have App running with appium             # features/step_definitions/plain_note.rb:2
    When click + button                              # features/step_definitions/plain_note.rb:6
    And I enter text "Data" and saved it             # features/step_definitions/plain_note.rb:10
    Then I should see "Data" note added on home page # features/step_definitions/plain_note.rb:17

1 scenario (1 passed)
4 steps (4 passed)
0m32.385s
Setting up Cucumber, Appium and SauceLabs
Saucelabs is a cloud testing framework which allow us to setup cross-browser, cross-platform and cross-device tests in the cloud. Saucelabs [@saucelabs] recently announced appium support which makes it easier to test Mobile apps in the cloud. You need to have saucelabs account in order to use it if not you can sign up for free account.
Note: I have used my Saucelabs details for this tutorial, you can try with your own.
App Setup for Sauce
In order to test PlainNote App on Saucelabs, we need to do some initial setup.
- Compile App for Sauce
In order to compile PlainNote App with sauce, we need to checkout an app to the different location.
$ mkdir Test
$ cd Test
$ git clone https://github.com/vkoser/PlainNote
$ cd PlainNote
Now we need to compile PlainNote App with sauce. [ Note Additional parameter TARGET_DEVICE_FAMILY]
xcodebuild -sdk iphonesimulator6.0 TARGETED_DEVICE_FAMILY=1
In Sauce, TARGETED_DEVICE_FAMILY parameter had different values e.g 1 is for iPhone, 2 is for iPad and 1,2 is for universal apps.
Now, once build is successful, it will create “PlaneNote.app” at ‘/build/Release-iphonesimulator‘.
$ cd /build/Release-iphonesimulator/
$ ls
PlainNote.app PlainNote.app.dSYM
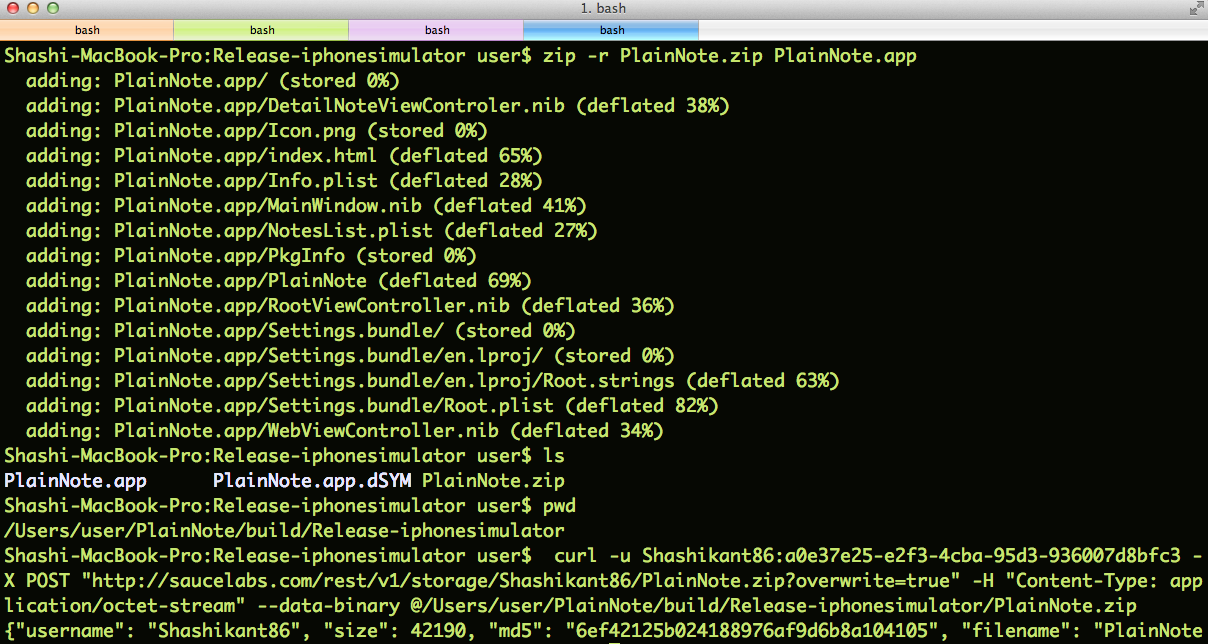
- Zip the PlainNote App & Upload to SauceLabs
$ zip -r PlainNote.zip PlainNote.app
 adding: PlainNote.app/ (stored 0%)
 adding: PlainNote.app/DetailNoteViewControler.nib (deflated 38%)
 adding: PlainNote.app/Icon.png (stored 0%)
 adding: PlainNote.app/index.html (deflated 65%)
 adding: PlainNote.app/Info.plist (deflated 28%)
 adding: PlainNote.app/MainWindow.nib (deflated 41%)
 adding: PlainNote.app/NotesList.plist (deflated 27%)
 adding: PlainNote.app/PkgInfo (stored 0%)
 adding: PlainNote.app/PlainNote (deflated 69%)
 adding: PlainNote.app/RootViewController.nib (deflated 36%)
 adding: PlainNote.app/Settings.bundle/ (stored 0%)
 adding: PlainNote.app/Settings.bundle/en.lproj/ (stored 0%)
 adding: PlainNote.app/Settings.bundle/en.lproj/Root.strings (deflated 63%)
 adding: PlainNote.app/Settings.bundle/Root.plist (deflated 82%)
 adding: PlainNote.app/WebViewController.nib (deflated 34%)
Now you will see ‘PlainNote.zip‘ file in that directory
$ ls
PlainNote.app      PlainNote.app.dSYM PlainNote.zip
Now, we need to upload this file to Sauce Labs temporary stoarage using Sauce REST API
$ curl -u Shashikant86:a0e37e25-e2f3-4cba-95d3-936007d8bfc3 -X POST "http://saucelabs.com/rest/v1/storage/Shashikant86/PlainNote.zip?overwrite=true" -H "Content-Type: application/octet-stream" --data-binary @/path/to/PlainNote/build/Release-iphonesimulator/PlainNote.zip
It will show you response
{"username": "Shashikant86", "size": 42190, "md5": "6ef42125b024188976af9d6b8a104105", "filename": "PlainNote.zip"}
It will be now uploaded to “sauce-storage:PlainNote.zip“. This will look like :
Note: I have committed “PlainNote.zip” file to GitHub , so that you can use it directly to upload it to SauceLabs.
Now, our App is ready to use it on SauceLabs
Cucumber- SauceLabs-Appium Setup
In Order to setup mobile APP on the Sauce Labs, we need to define ‘profile’ in the ‘featues/support/env.rb‘ file
$ vim features/support/env.rb
- Add Sauce Capabilities and Sauce Url
We need to add sauce_capabilities mentioned in the saucelabs appium tutorial. We also need to specify sauce-url where the tests will be running. It would be saucelabs url ‘http://Shashikant86:a0e37e25-e2f3-4cba-95d3-936007d8bfc3@ondemand.saucelabs.com:80/wd/hub’
def sauce_capabilities
  {

    'app' => 'sauce-storage:PlainNote.zip',
    'device' => 'iPhone Simulator',
    'username' => 'Shashikant86',
    'access-key' => 'a0e37e25-e2f3-4cba-95d3-936007d8bfc3',
    #'os' => 'iOS'
    #'browserName' => 'iPhone',
    'platform' => 'OS X 10.8',
    'version' => '6.0',
    'name' => 'Running PlainNote wit Cucumber and Appium',
    'passed' => 'true'

  }
def sauce_url "http://Shashikant86:a0e37e25-e2f3-4cba-95d3-936007d8bfc3@ondemand.saucelabs.com:80/wd/hub" end
- Add Driver for Sauce
def sauce
  @sauce ||= Selenium::WebDriver.for(:remote, :desired_capabilities => sauce_capabilities, :url => sauce_url)
end
After { @sauce.quit }
You can see in the source code that, we have new feature file ‘features/plain_note_sauce.feature’ implemented in the same way but using sauce driver object in the ‘feature/step_definitions/plain_note_sauce.rb’
Now you can run sauce feature file
$ bundle exec cucumber features/plain_note_sauce.feature
and you will see Tests running on the SauceLabs. Once everything done.
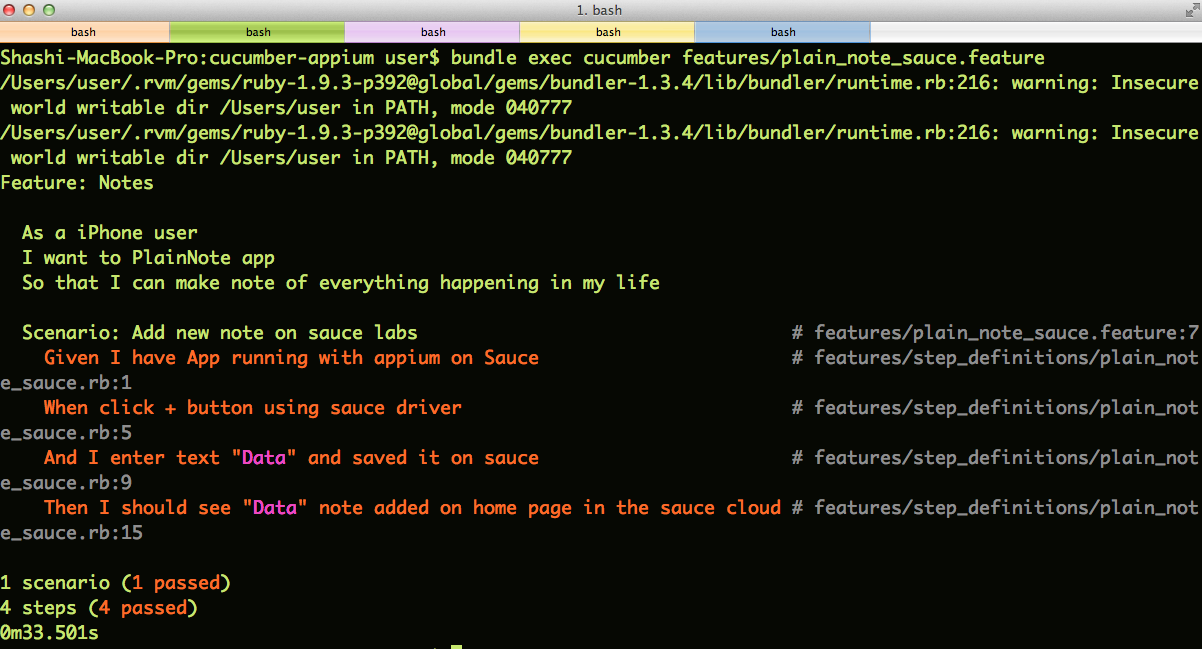
You can watch video and screenshots of what happened on SauceLabs over here
Source-Code
The source-code of the demo is available on GitHub Cucumber-Appium. You can try it yourself.
$ git clone https://github.com/Shashikant86/cucumber-appium
$ cd cucumber-appium
$ rvm use 1.9.3
$ bundle install
To run with local profile, start Appium and
bundle exec cucumber features/plain_note.feature
To run against Sauce, you need to upload App to sauce using your sauce details also change usename and api key in the ‘features/support/env.rb‘ with you details
curl -u USERNAME:API-KEY -X POST "http://saucelabs.com/rest/v1/storage/USERNAME/PlainNote.zip?overwrite=true" -H "Content-Type: application/octet-stream" --data-binary @/path/to/cucumber-appium/PlainNote.zip
Then you can run sauce feature with Appium.
bundle exec cucumber features/plain_note_sauce.feature
Conclusion
Mobile testing framework Appium can be used for iOS automation with BDD tool like Cucumber and cloud testing services SauceLabs. Happy BDD !