Note : This post may not work with recent Behat. Please use Official Docs for Behat OR my Github repo for to get it working without any issue https://github.com/Shashikant86/BehatDemo
Abstract:
The key benefits of Behavior-Driven-Development (BDD) practices are communication enhancement and customer satisfaction. You can read more about that by Dan North and Gojko Adzic. Perhaps the biggest practical challenge in the way of reaping those benefits is the burden of provisioning, installation and maintenance of requisite complex and fussy infrastructure. The recent availability of latest CI servers like Jenkins & cloud based testing services like Sauce Labs carries the potential to remove that barrier. This post discusses and shows how to integrate Behat an emerging BDD framework for PHP with continuous integration server like Jenkins and cloud based testing services like Sauce Labs.
What is Behat?
Behat is a BDD framework for PHP. There are some tools available for BDD like Cucumber for Ruby, SpecFlow for .NET and Lettuce for Python. Behat is the first BDD tool for PHP applications. Developers can also use the PHPSpec framework to implement classes within the Behat projects. Behat is written in PHP by Konstantin Kudryashov. With Behat, you can write human readable stories which turns as tests to run against your application. Behat can be used for API testing, functional testing and data-driven testing. Developers will do API testing and we will carry on with functional testing (web acceptance testing) with Behat.
Functional Testing with Behat and Mink
Behat is used for acceptance testing (any tests) by executing a Gherkin scenario. Developers can implement integrated classes. Testers start thinking of more workflow level and technical level steps (actions) which turns as scenarios for features. Once tester started to think of Web Acceptance Testing (functional testing) with browser interaction then another tool called “Mink” comes into the picture.
Mink is used for browser emulation (functional testing) where browser interaction takes place. As of now, there are following Selenium drivers available for browser emulation.
- Selenium 1 Driver provides bridge for Selenium RC (Selenium 1).
- Selenium 2 driver provides bridge for Selenium 2. (Facebook webdriver) for PHP.
Behat In Action:
You must have pear installed in order to proceed with Behat installation. Now we will run these commands from your terminal window:
|
1 2 3 4 |
$ sudo pear channel-discover pear.behat.org $ sudo pear channel-discover pear.symfony.com $ sudo pear install behat/gherkin-beta $ sudo pear install behat/behat-beta |
Test your installation by running this command:
|
1 2 |
$ behat --version Behat version 2.2.0 |
Now let’s install Mink, run following commands from terminal window:
|
1 2 3 |
$ pear channel-discover pear.symfony.com $ pear channel-discover pear.behat.org $ pear install behat/mink |
Mink is ready to use. We have to include “mink/autoload.php” in your classes as shown below:
|
1 |
require_once 'mink/autoload.php'; |
Start Your Project
Navigate to project root directory and initialize Behat by running these commands:
|
1 2 3 4 5 6 7 8 9 10 11 12 13 14 15 16 17 18 19 20 21 |
$ cd /path/to/my/project $ ls application $ behat --init +d features - place your *.feature files here +d features/bootstrap - place bootstrap scripts and static files here +f features/bootstrap/FeatureContext.php - place your feature related code here $ ls application features $cd features $ ls bootstrap $cd bootstrap $ls FeatureContext.php |
This will create “features” directory and “bootstrap/FeatureContext.php” for you. Now we will directly jump to the project created with a feature file.
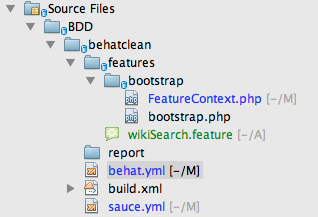
You can use NetBeans with installed Cucumber plugin for Gherkin syntax highlighting. Project structure will look like this:
Directory Structure
Behat has already created “features” directory and “features/bootstrap” directory with “FeatureContext.php” in it.
bootstrap.php
We can this create file in define some constants and some third-party libraries which needs to be included in class files. This file should look like this:
|
1 2 3 4 5 6 7 |
<?php date_default_timezone_set('Europe/London'); require_once 'mink/autoload.php'; require_once 'PHPUnit/Autoload.php'; require_once 'PHPUnit/Framework/Assert/Functions.php'; require_once 'PHPUnit/Extensions/SeleniumTestCase.php'; require_once 'PHPUnit/Extensions/SeleniumTestCase/SauceOnDemandTestCase.php'; |
behat.yml
This file is a default config file that Behat uses to execute features. Example of behat.yml is shown below:
|
1 2 3 4 5 6 7 |
default: context: parameters: javascript_session: selenium base_url: http://en.wikipedia.org/wiki/Main_Page browser: firefox show_cmd: open %s |
You can change the drivers by changing the “javascript_session” parameter. It can be “selenium” or “webdriver”.
sauce.yml
This file is used for running features on Sauce Labs. The code for this file is explained in “behat and Sauce Labs” section below.
build.xml
This file is used for running features with ANT. We can use this ANT file to plug into Jenkins. Simple ANT file should look like this:
|
1 2 3 4 5 6 7 8 9 10 11 12 13 14 15 16 17 18 |
<project name="behat" default= "behat" basedir=""> <delete dir="${basedir}/report" /> <mkdir dir="${basedir}/report"/> <target name="behat"> <exec dir="${basedir}" executable="behat" failonerror="true"> <arg line="-f junit --out ${basedir}/report"/> </exec> </target> <target name="create-test-report" description="Generate reports for executed JUnit tests."> <junitreport todir="./report"> <fileset dir="${basedir}/report"> <include name="TEST-*.xml"/> </fileset> <report format="frames" todir="./report/html"/> </junitreport> </target> </project> |
report
This directory is used to store *.xml reports generated by Behat’s “junit” formatter. We can use this reports to plug into Jenkins.
Start your Engine
Remember, you have to download latest version of selenium server. Now navigate to directory where you saved selenium server .jar file. You have to launch it using command shown below:
|
1 |
java -jar selenium-server-standalone-2.15.0.jar |
Behat & Sauce Labs
Sauce Labs is a cloud testing service which allows selenium tests to run in the cloud. Sauce Labs allocates machines and browsers for your tests, capture screenshot for every step and record video of all jobs(tests). You don’t need to setup separate machines to run tests. Sauce labs helps us to write tests without complex infrastructure.
In order to integrate Behat with Sauce Labs, you need to have an account with Sauce Labs. You need “Username” and “API Key” to plug them into a config file.
Behat executes features with “behat.yml” file by default, but we can run features with any other configuration file. We can create another configuration file like “sauce.yml” to run features on Sauce Labs. Example “sauce.yml” should look like this:
|
1 2 3 4 5 6 7 8 9 10 11 12 13 14 15 16 17 18 19 |
default: context: parameters: default_session: goutte javascript_session: selenium base_url: http://en.wikipedia.org/wiki/Main_Page browser: firefox selenium: host: ondemand.saucelabs.com port: 80 browser: > { "username": "your username", "access-key": "your API key", "browser": "firefox", "browser-version": "7", "os": "Windows 2003", "name": "Testing Selenium with Behat" } |
We will use “sauce.yml” as a config file to run features on Sauce Labs. If you wish to run all features from “features” directory on Sauce labs, you can use this command:
|
1 |
behat -c sauce.yml |
When to implement step definitions?
- If you can speak fluent Gherkin, then you don’t need to write code. Behat/Mink will understand Gherkin and run your features without suggesting step definitions.
- If features written by someone else, you can take full advantage of Mink API’s in order to implement step definitions suggested by Behat/Mink.
- It’s very important to write good Gherkin to write minimum code.
- It’s very easy to access Mink API’s by writing simple code.
Now we will see how will you “click” particular element on page. You need to use Xpath as a locator for that element. Mink will suggest some step definitions, you need to complete it like this:
Example : Feature wikiSearch
We will write simple feature to add product into shopping cart. Feature will look like this:
|
1 2 3 4 5 6 7 8 9 10 11 12 13 14 15 16 17 18 19 20 21 22 |
Feature: wikiSearch In order to search information on wiki As a Wiki user I want to get sensible results from site @javascript Scenario Outline: Search Keywords on Google Given I am on "/" And I fill in searchBox with "<input>" When I press search button Then I should see "<output>" Examples: | input | output | | London | lʌndən/ | | NewYork | nɪu ˈjɔək | | Sydney | sɪdni/ | | Mumbai | मुंबई | | Bejing | 北京 | | Tokyo | 東京 | | Lahore | لاہور | | Paris | paʁi | |
Feature Explained

A feature file mentioned above is a good example of data-driven testing. This feature will execute our scenario for 8 different data set mentioned in the example section. This feature will have following steps
- User will navigate to Wikipedia main page.
- User enter “London” in search box.
- User will check if that page has city name in their local language as described in output.
- This test will run for 8 different cities as shown in “examples” section of feature.
This feature is also good example of testing internationalization as it consist of test data (examples) in different languages.
Now we will run this feature using command:
|
1 |
behat --name wikiSearch |
Remember, we are running it locally for now using default config file “behat.yml” with Selenium driver. After executing above command, we will get some step definitions suggested by Behat/Mink
|
1 2 3 4 5 6 7 8 9 10 11 12 13 14 15 16 17 18 19 20 21 22 23 24 25 26 27 28 29 30 31 32 33 34 35 36 37 38 39 40 41 42 43 44 45 46 47 48 49 50 51 52 53 54 55 56 57 58 59 60 |
Feature: wikiSearch In order to search information on wiki As a Wiki user I want to get sensible results from site @javascript Scenario Outline: Search Keywords on Wiki # features/wikiSearch.feature:8 Given I am on "/" # FeatureContext::visit() And I fill in searchBox with "<input>" When I press search button Then I should see "<output>" # FeatureContext::assertPageContainsText() Examples: | input | output | | London | lʌndən/ | Undefined step "I fill in searchBox with "London"" Undefined step "I press search button" | NewYork | nɪu ˈjɔək | Undefined step "I fill in searchBox with "NewYork"" Undefined step "I press search button" | Sydney | sɪdni/ | Undefined step "I fill in searchBox with "Sydney"" Undefined step "I press search button" | Mumbai | मुंबई | Undefined step "I fill in searchBox with "Mumbai"" Undefined step "I press search button" | Bejing | 北京 | Undefined step "I fill in searchBox with "Bejing"" Undefined step "I press search button" | Tokyo | 東京 | Undefined step "I fill in searchBox with "Tokyo"" Undefined step "I press search button" | Lahore | لاہور | Undefined step "I fill in searchBox with "Lahore"" Undefined step "I press search button" | Paris | paʁi | Undefined step "I fill in searchBox with "Paris"" Undefined step "I press search button" 8 scenarios (8 undefined) 32 steps (8 passed, 8 skipped, 16 undefined) 0m15.771s You can implement step definitions for undefined steps with these snippets: /** * @Given /^I fill in searchBox with "([^"]*)"$/ */ public function iFillInSearchboxWith($argument1) { throw new PendingException(); } /** * @When /^I press search button$/ */ public function iPressSearchButton() { throw new PendingException(); } |
You can see above, Behat/Mink has suggested some step definitions for undefined steps. We can implement these step definitions using Mink in “bootstrap/FeatureContext.php” file. We can implement first step definition “iFillInSearchboxWith($argument1)” like this:
|
1 2 3 4 5 6 7 8 |
/** * @Given /^I fill in searchBox with "([^"]*)"$/ */ /* public function iFillInSearchboxWith($input) { $this->fillField("searchInput",$input); } |
Now we will run “behat”command again, you can see eight step is passed. Terminal window output should be like this:
|
1 2 3 4 5 6 7 8 9 10 11 12 13 14 15 16 17 18 19 20 21 22 23 24 25 26 27 28 29 30 31 32 33 34 |
Feature: wikiSearch In order to search information on wiki As a Wiki user I want to get sensible results from site @javascript Scenario Outline: Search Keywords on wiki # features/wikiSearch.feature:7 Given I am on "/" # FeatureContext::visit() And I fill in searchBox with "<input>" # FeatureContext::iFillInSearchboxWith() When I press search button Then I should see "<output>" # FeatureContext::assertPageContainsText() Examples: | input | output | | London | lʌndən/ | Undefined step "I press search button" | NewYork | nɪu ˈjɔək | Undefined step "I press search button" | Sydney | sɪdni/ | Undefined step "I press search button" | Mumbai | मुंबई | Undefined step "I press search button" | Bejing | 北京 | Undefined step "I press search button" | Tokyo | 東京 | Undefined step "I press search button" | Lahore | لاہور | Undefined step "I press search button" | Paris | paʁi | Undefined step "I press search button" 8 scenarios (8 undefined) 32 steps (16 passed, 8 skipped, 8 undefined) 0m25.568s |
You can implement step definitions for undefined steps with these snippets:
|
1 2 3 4 5 6 7 |
/** * @When /^I press search button$/ */ public function iPressSearchButton() { throw new PendingException(); } |
We have to repeat this process until all steps get “passed”. We can implement these steps by adding some code in “bootstrap/FeatureContext.php” file. The code will look like this:
|
1 2 3 4 5 6 7 8 9 10 11 12 13 14 15 16 17 18 19 20 21 22 23 24 25 26 27 28 29 30 31 32 33 34 |
<?php use BehatBehatContextClosuredContextInterface, BehatBehatContextTranslatedContextInterface, BehatBehatContextBehatContext, BehatBehatExceptionPendingException; use BehatGherkinNodePyStringNode, BehatGherkinNodeTableNode; use BehatMinkBehatContextMinkContext; use BehatMinkSession; use BehatMinkDriverDriverInterface; require_once 'bootstrap.php'; /** * Features context. */ class FeatureContext extends MinkContext { /** * @Given /^I fill in searchBox with "([^"]*)"$/ */ public function iFillInSearchboxWith($input) { $this->fillField("searchInput",$input); } /** * @When /^I press search button$/ */ public function iPressSearchButton() { $this->getMink()->getSession()->getDriver()->click("//*[@id='searchButton']"); $this->getMink()->getSession()->wait("3000"); } |
After implementation, we have to run “behat” command again. You will see this:
|
1 2 3 4 5 6 7 8 9 10 11 12 13 14 15 16 17 18 19 20 21 22 23 24 25 26 |
Feature: wikiSearch In order to search information on wiki As a Wiki user I want to get sensible results from site @javascript Scenario Outline: Search Keywords on wiki # features/wikiSearch.feature:8 Given I am on "/" # FeatureContext::visit() And I fill in searchBox with "<input>" # FeatureContext::iFillInSearchboxWith() When I press search button # FeatureContext::iPressSearchButton() Then I should see "<output>" # FeatureContext::assertPageContainsText() Examples: | input | output | | London | lʌndən/ | | NewYork | nɪu ˈjɔək | | Sydney | sɪdni/ | | Mumbai | मुंबई | | Bejing | 北京 | | Tokyo | 東京 | | Lahore | لاہور | | Paris | paʁi | 8 scenarios (8 passed) 32 steps (32 passed) 0m42.794s |
We managed to get all our scenario/steps “passed”. It’s time to login into your Sauce Labs account to see this scenario running on Sauce Labs.
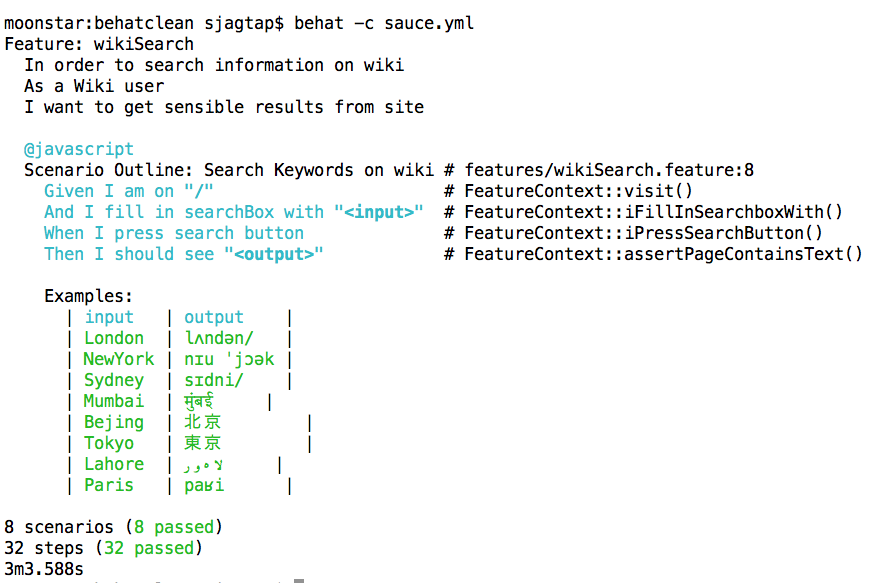
Now we have to use “sauce.yml” config file. We will run below mentioned command from terminal and we can see output on Sauce Labs as shown below:
|
1 |
behat -c sauce.yml |
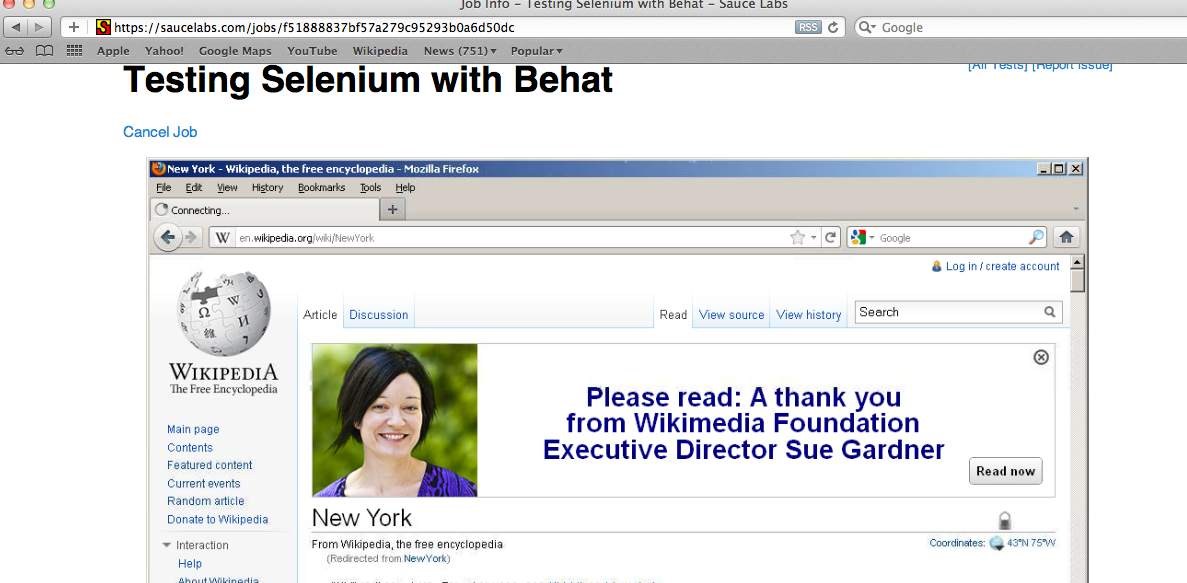
Screenshots for feature running on Sauce Labs:
You can see detail steps, screenshots and video of this job on Sauce Labs
See terminal output as shown below:
Building Features with Jenkins

Continuous Integration (CI) is one of the best practice in agile projects to detect bugs early. Each integration is verified by an automated build to detect integration errors as quickly as possible. Now we will see how we can integrate Jenkins to our behat project.
Don’t forget to start your engine before building project in Jenkins. You have start Selenium/WebDriver before starting Jenkins.
There is “/report” directory to save JUnit reports in xml format generated by Behat. You can generate reports using this command:
|
1 |
behat -f junit --out ~/pathto/report |
To continue, you need Jenkins installed on your machine. Now start Jenkins by executing *.war file from terminal on port 8080. You also need to visit “http://localhost:8080” to see Jenkins GUI.
|
1 |
$ java -jar jenkins.war |
- Visit http://localhost:8080/ and you should see Jenkins Dashboard.
- Create “New Job” for behat project.
- Specify your SCM to create Jenkin’s workspace on your system.
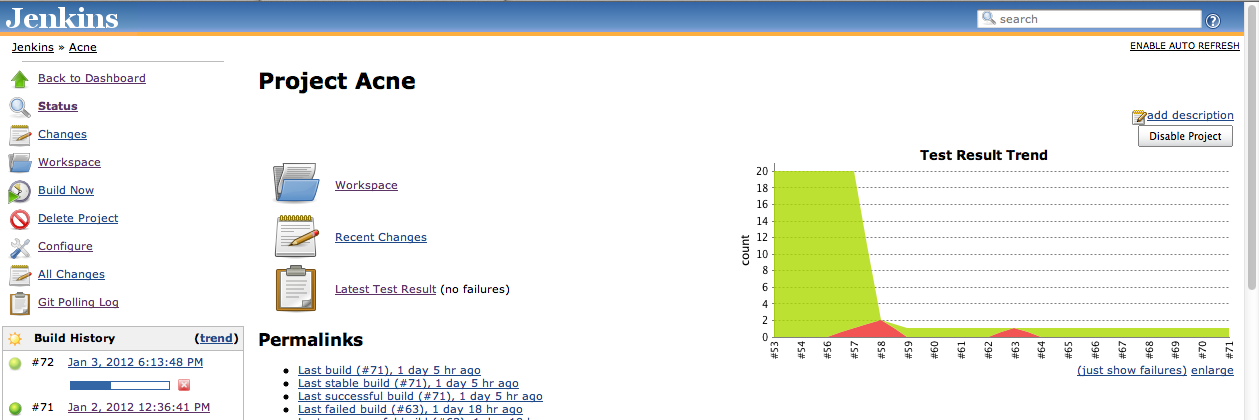
- You can specify build file as per your project structure. In here I have configured in “Acne” project by specifying build file path and test reports like this.
- Save your configuration. Go back to project and click”Build Now”, you will see:
- You can see features running in browser.
- Sit back and enjoy your features running on Jenkins till it finishes job.
- Few minutes later, you will see your build is “Green”:
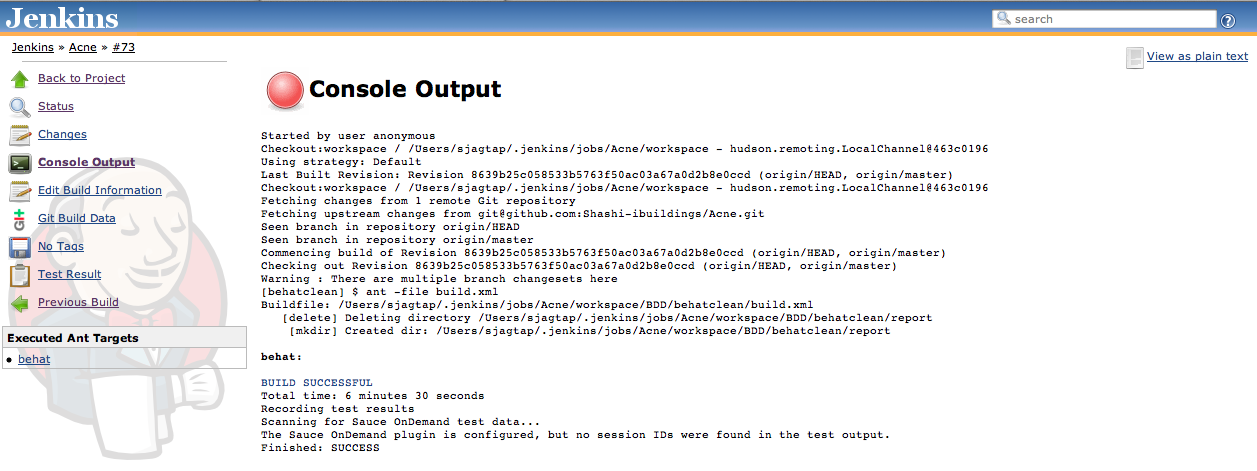
- Watch your test results:
Behat, Sauce Labs and Jenkins
You can run all your features on Sauce Labs just by updating ANT file like:
|
1 2 3 4 5 6 7 8 9 10 11 12 13 14 15 16 17 18 |
<project name="behat" default= "behat" basedir=""> <delete dir="${basedir}/report" /> <mkdir dir="${basedir}/report"/> <target name="behat"> <exec dir="${basedir}" executable="behat" failonerror="true"> <arg line="-c sauce.yml -f junit --out ${basedir}/report"/> </exec> </target> <target name="create-test-report" description="Generate reports for executed JUnit tests."> <junitreport todir="./report"> <fileset dir="${basedir}/report"> <include name="TEST-*.xml"/> </fileset> <report format="frames" todir="./report/html"/> </junitreport> </target> </project> |
Alternatively, you can configure Sauce On demand tunnel into your Jenkins.
Conclusion:
We can write web acceptance tests with Behat and Mink combination. We can plug them into Sauce Labs with config file (“sauce.yml”) and run them on a CI server. Now you can implement BDD practices for PHP applications by taking benefit from Bahat and Sauce Labs.
Demo
You can watch video demonstration of this blog on Vimeo and YouTube. More about me


