
XCFit 2.0
Glad to announce new version of XCFit with brand new features. You can find release notes on Github here. If you are new to XCFit then XCFit a.k.a (XCUI, Cucumberish and Fitnesse Integrations Tests) is a full stack Xcode BDD framework for Swift iOS and macOS apps. XCFit allows us to write API level, UI and Acceptance Tests with Swift in human readable language using tools like Cucumber and Fitnesse in Xcode. We can still use Apple’s brand new UI Testing framework (XCUI) under the hood of Cucumberish. XCFit is fully automated solution for Cucumberish and Fitnesse. You can use 80(Fitnesse):20(Cucumberish) formula to automate Acceptance and UI Testing for better coverage and faster feedback. XCFit is available on RubyGem, CocoaPods and Swift Package Manager.
XCFit 2.0 has just released !

XCFit 2.0 New Features
- Improved Xcode Templates with support of Page Object Pattern
- New Xcode Target Template to support Page Object Pattern for Apple’s XCUI Test Framework
- Separated Xcode Templates to support both Xcode 7 (Swift 2) and Xcode 8 ( Swift 3). Added Separate option in the XCFit RubyGem to download XCFit Templates for Xcode 8 and Xcode 7.
- Added Helper method to support XCUI Testing and made it available with Swift Package Manager
- Introducing Swift Package Manager for XCFit. It’s available to use with major version 2
- Embedded Stable version of Cucumberish in XCFit and made it available via Cocoapods
XCFit : Step By Step Guide
- You can now write Given When Then (Gherkin) and Decision Table in Xcode. In Short, you can do BDD in Xcode for your iOS app.
- You can now write/Execute all your Acceptance Tests and UI Tests using Apple’s brand new programming language “Swift” in Xcode. Goodbye Appium, Calabash, Frank, KIF and Goodbye Ruby,Java, Python. It’s pure Swift !!
- XCFit provides automated Xcode Target Templates for Cucumberish, Fitnesse and Page Object Pattern(XCUI) targets which reduce hectic Xcode configuration steps. It also arrange code in Xcode groups. All happens in one command
- XCFit will setup test frameworks within a minute and works for Xcode 8 and Xcode 7.
XCFIT allows follwing frameworks
- Cucumberish BDD FrameworkXCFit setup Cucumber style BDD framework with “Cucumberish UI Test Bundle’ Templates
- Page Object Pattern for XCUI Test framework from AppleXCFit setup Page Object Pattern for Apple’s XCUI Test using ‘XCUI POM Test Bundle’ Templates
- Fitnesse Acceptance Tests for iOS using OCSlim ProjectXCFit allows us to setup Fitnesse style decision table test framework with OCSlimProject using ‘Acceptance Tests Bundle’ templates.
XCFit Available on
- CocoaPods — XCFit-CocoaPods : BDD Style scenarios for iOS App
- RubyGems — xcfit-RubyGem : Automated Xcode Templates
- Swift Package Manager : 2.0.0 : XCUI Test Framework Helpers
Tech & Software Requirements
XCFit uses a number of open source projects to work properly. You need to have following
Hardware
You must have Mac Operating System with OSX/MacOS version > 10.9
Software
- Ruby
- Use RVM for GEM management. Ideally Ruby > 2.X. You can use system Ruby with sudo
- Xcode8
- Ideally Xcode 8 but works on Xcode 7 as well.
- RubyGems
- RubyGem with Cocoapods installed
- Curl on Mac
- Might be pre-installed but worth double checking.
- iOS-Sim
- Node Package required to launch iOS app for Fitnesse Acceptance tests.
- Java
- Java should be installed on Mac, it is required for Fitnesse Acceptance Test
- Ruby Packages(optional)
- Xcpretty, Fastlane(Optional), Rake, Bundler etc
Installation
Install XCFit Gem
In order to get started, We need to install XCFit from RubyGems. This will set our Xcode for BDD
$ gem install xcfit
You need to use with ‘sudo’ if you are using system (pre-installed) Ruby(2.0). XCFit gem will be used to set all the Xcode Templated for Xcode 8 as well Xcode 7
Now that you can execute ‘xcfit’ command from your terminal/iTerm etc etc. Example Output Looks like this :
$ xcfit
Tasks:
  xcfit get_cucumberish VERSION
  xcfit get_fitnesse
  xcfit help [TASK]
  xcfit set_xcode7_templates
  xcfit set_xcode_templates
Install XCFit Cocoapod and Swift Package (Covered later)
Later, we need to install XCFit from CocoaPods to enable Cucumberish and Fitnesse test. We can also get XCFit from Swift Package Manager if we need to have additional helpers for the XCUI test framework.
Setup Xcode Templates
In existing app or brand new app, we have to enable the Xcode templates for targets to speed up the things.
Xcode 8
To setup Templates for Xcode 8.
$ xcfit set_xcode_templates
Xcode 7
To setup Templates for Xcode 7.x.
$ xcfit set_xcode7_templates
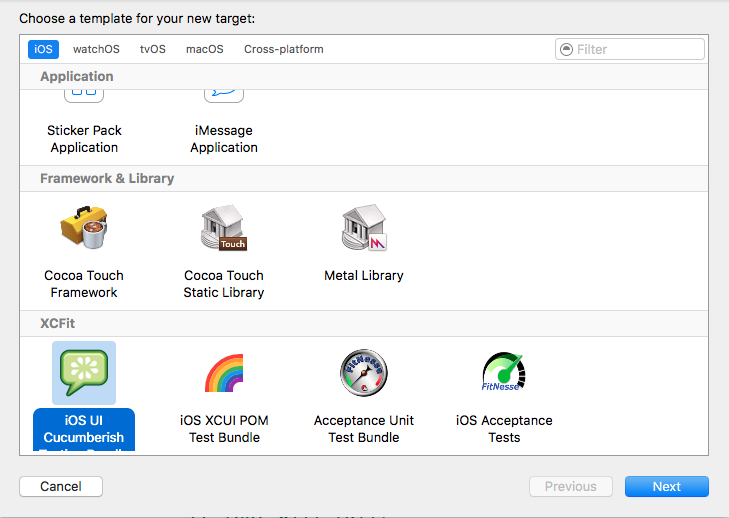
- This will add couple of templates to your Xcode for iOS and macOS apps. In your app if you go to ‘File—>New—>Target’
You will see new option for iOS i.e ‘XCFit’. Once Clicked on it. You will see Cucumberish UI and Fitnesse Acceptance Tests. XCUI POM, Fitnesse Acceptance Unit Test bundles. As shown
Setting Cucumberish BDD Scenarios in Xcode
Setup ‘iOS UI Cucumberish Test Bundle’ Target
- From Xcode, create a new app(Or use existing app) and selct File —> New —-> Target
- Now Select ‘XCFit’ for iOS app and Click on ‘Cucumberish UI Test Bundle’
- Once Clicked on the target e.g ‘Cucumberish UI Test Bundle’ Xcode will create UI testing target with all the required files with Bridging header for Cucumberish UI Testing. It create Page Object Pattern with all required files with screens, steps definitions and Cucumberish initialiser swift file.
What’s in the Cucumberish Template ?
- YOUR_CUCUMBERISH_TARGET.swift
This file is at the base of the target. This initiate Cucumberish for project. We need to register all step definitions in this file.
- Screens
This is groups where we can abstract logic of every screen in the app. Example file are ‘HomeScreen.swift’ and ‘BaseScreen.swift’
- Step_Definitions
This groups has all the step definitions related to screen. Example file ‘HomeScreenSteps.swift’. Once implemented we need to register it in the initialiser file mentioned above.
- Common
This group has common code like extensions and common steps. The example file ‘CommonStepDefinitions.swift’ has some steps that can be used in the feature file. It also has ‘Hooks.swift’ to ad cucumber hooks.
- Supporting Files
This groups all the Objective-C headers and Bridging headers needed to get Cucumberish working with Swift.
What’s not in the Cucumberish Template
- Features Directory
We don’t have ‘Features’ directory in the template because it needs to have directory on the disk and should be added to Xcode as ‘Folder Reference’ not Group.
- Create a Direcory called “Feature”
- Now Add sample Gherkin Feature File to ‘Features’ directory either by File->New->Gherkin Or Just add it using your favourite text editor e.g demo.feature with content
Feature: Demo App Feature

Scenario: Demo Scenario

Given the app is running
- Now Drag and Drop ‘Features’ directory to Xcode Cucumberish target
- Select only ‘Create folder references‘ Option. ** Do Not Select ‘Create groups’ Or ‘Copy items if needed’**
Here is how to do it. 
- Cucumberish Header Files
We still don’t have content of Cucumberish to be included in our project.
Getting Cucumberish into our Target
In order to get Cucumberish source content. There are few ways we can do that
- Adding XCFit CocoaPod to Project
Create a ‘Podfile’ if you don’t have already. In your Podfile, add following Pod entry and update/install pod
target '$_YOUR_CUCUMBERISH_TARGET' do
      pod 'XCFit'
end
Now Install Pod
$ pod install
You can do that easily.
Now close the existing Xcode session and Xcode Workspace next time.
Note There is issue with Cocoapods when you have
'use_frameworks!', it will not import header files and build will fail. If you are not using Frameworks in th Podfile then this approach is OK.
- Manually Copy Content of Cucumberish and Drag to Xcode Prefered
We can manually copy content of Cucumberish directory and drag to target as with option “**Create groups” and “Copy items if needed”.
Here is how to setup everything in am minute !
- Use Carthage without build and drag the folder to target
Create a Cartfile with following Content
github "Ahmed-Ali/Cucumberish"
Now run Carthage wihtout build option.
$ carthage update --platform iOS --no-build
Now in the Carthage/Checkout directory has Cucumberish. Just add that to target or workspace.
Please choose one of the suitable option for you.
We now have everything we needed to run demo Cucumber demo test. Update Scheme if don’t want to run unit test or other type of tests. and press ‘CMD+U’
Congratulations !! You have just ran your first Cucumber BDD Scenario in the Xcode. Now add your own scenarios.
Create Separate Scheme if needed
XCFit adds ‘Cucumberish’ target to existing Scheme. You can remove that target and run separate scheme to keep it independent from Unit tests. Make sure you make the new scheme executable for Running.
XCUI Page Object Pattern
Now, we have seen that it’s failrly easy to setup BDD Style tests with Cucumberish but some people don’t want that overhead of adding extra layer of Gherkin. XCFit gives an option to use very polular Page Object Pattern with Apple’s Xcode UI Testing framework.
Setup ‘XCUI POM Test bundle’ Target
- From Xcode, create a new app(Or use existing app) and selct File —> New —-> Target
- Now Select ‘XCFit’ for iOS app and Click on ‘XCUI POM Test Bundle’
- Once Clicked on the target e.g ‘XCUI POM Test Bundle’ Xcode will create UI testing target with properly structured Xcode Groups and required files. You can then make physical directories on Disk Or change the folder/group structure as per your need.
- You don’t have to so any setting to run those demo XCUI tests. Just CMD+U and You are good to go !
What’s in the XCUI POM Template ?
- YOUR_CUCUMBERISH_TARGETPageObjectTests.swift
This file is at the base of the target. It’s exactly same file that Apple’s XCUI Test generate at first. You may use it for recording the tests or simply delete it if not needed.
- Screens
This is groups where we can abstract logic of every screen in the app. Example file are ‘HomeScreen.swift’ and ‘BaseScreen.swift’ This assumes that your apps is made up of multiple screens. You can write individual screen class which extend BaseScreen. All the functionality related to screen can be included in this class.
- Sections
This group has ‘HomeElements.swift’ class which stores all the locators of HomeScreen in enums. Sections are defined to store locators of the screen in the form of enums. Here are some samples we can store Images, Buttons and Static Texts of the HomeScreens. We can access those enums from anywhere from the Test methods or page objects.
- Protocols
Swift is protocol oriented language so feel to start with Protocol per screen. This group has ‘HomeProtocol.swift’ file where there is way to implement protocol oriented testing. Here is example of sample protocol for the homescreen. We can implement this protocol in the XCTest method as needed or we can write some extensions to support Testing.
- Tests
This group has all the test for our app. Currently demo template has two tests ‘HomeScreenTest.swift’ and ‘ProtocolOrientedTest.swift’. This examples shows how XCUI test can be implemented in the Object Orinted way and Protocol oriented way.
- TestBase
Testbase is group where we can abstract all setup, teardown and common stuff in the base class. Every Screen then use this class as base. You can add more stuff as needed e.g Fixtures, Launch Arguments
Fitnesse for iOS: Acceptance/Contract Tests
Fitnesse is fully integrated standalone wiki and acceptance testing framework for BDD Style testing. As of now we have seen Cucumber and Page Object pattern test frameworks. If you really wanted to get more information about Fitnnese for iOS, please follow documentation on OCSlim project. XCFit adopted the framework as dependeny to make it full stack BDD. We will cover basic setup as part of this document.
Setup ‘Acceptance Test’ Target template
- From Xcode, create a new app(Or use existing app) and selct File —> New —-> Target
- Now Select ‘XCFit’ for iOS app and Click on ‘iOS Acceptance Tests ‘
- Once Clicked on the target e.g ‘OS Acceptance Tests’ Xcode will create new target with all required files and groups for Acceptance testing
- Select ‘Acceptance Test’ Scheme from Xcode and try to build
- The build will fail as we need fix some Swift3 related issue as well as we need to add XCFit/OCSlimProject Pod to the to the podfile.
** Watch it so far**
- To Fix Swift Issue : Just Click on ‘Edit-> Convert-> To Current Swift Syntax
- To Fix Pod issue : Add ‘XCFit’ for AcceptanceTests target
target 'AcceptanceTests' do
      pod 'OCSlimProject'
end
You can install Pod by running ‘pod install’
Now, You should be able to build ‘Acceptance Tests” target.
You should also note that, the script ‘Launch Fitnesse’ has been created in the base of the project. Launch the fitness by exucuting that script from command line
$ sh Launch Fitnesse
The browser will popup with example test. You should be able to excute that suite and see then running and passing

If you get any errors at this stage, please confirm that you have Java as well as ios-sim node package installed.
So, Congratulations again.. You have just executed Fitnesse test fro browser which is talking to your app.
Setting up Fitnesse Acceptance Target with XCTest
You can also setup Fitnesse Acceptance Tests but you need to use Cocoapods for this target.
You can find detailed blog post on Dzone
Add Acceptance and Acceptance Unit Test Target to Project
We have all the predefined targets for FitNesse. Just add “Acceptance Tests” target from the template and “AcceptanceUnitTests” target from the bundle. You will need “FitNesse Suite page name” to create this target but just put “OCSlimProjectExamplePage” there for now . Add your ‘AcceptanceTests’ target as a ‘Target Dependancy’ of this new target in Build Phases. This ensures that it the latest code has been built prior to the tests being run.
Add Pod Dependencies
We need to create a “Podfile” at the root of the project with the following content.
target 'AcceptanceUnitTests' do
   pod 'OCSlimProjectTestBundleSupport'
end
Now, we can run ‘pod install’ at this stage and close the current Xcode session and open project workspace.
Build Acceptance Tests Target
At this stage, we should be able to build the “Acceptance Tests” target. If you are using Xcode8, you might see some warning related to the Swift3 Syntax. Just Click on ‘Edit-> Convert-> To Current Swift Syntax
Now you should be able to build an “Acceptance Tests” target. Once, build is successful, you should see “LaunchFitnesse” script is generated in the root of the project. We can launch and execute the fitness test as shown below.
Test AcceptanceUnitTests Target
Now if you select “AcceptanceUnitTarget” and press CMD+U.
Now we can see that FitNesse tests are running as shown above. We can add this to main scheme to make sure we are running it after the unit tests to follow proper development workflow. We can build and run it as our normal unit tests.
Continuous Integration + Fastlane
Now that , we have seen how to run Cucumberish, XCUIPOM, FitNesse acceptance tests from Xcode but it’s a good idea to run it with Fastlane. We can also take control of version of Cocoapods and Fastlane by using Bundler. Let’s create a Gemfile at the root of the project with the following gem
source "https://rubygems.org"
gem 'cocoapods'
gem 'fastlane'
Let’s also create directory “fastlane” and make “Fastfile” with following content
fastlane_version "1.104.0"
default_platform :ios
platform :ios do
before_all do
   system "rm -rf ../test_reports/"
   system "bundle install"
   system "pod install"
    system "bundle exec fastlane add_plugin trainer"
end
desc "Runs all the XCUI POM, Cucumberish tests"
  lane :xcfit_ui_test do
   scan(
   scheme: "XCFit2Demo",
   destination: 'platform=iOS Simulator,name=iPhone 7 Plus,OS=10.0',
   output_directory: "test_reports/",
   output_types: "html",
   fail_build: false
   )
  end

  desc "Runs Fitnesse Tests"
  lane :fitnesse do
   scan(
   scheme: "AcceptanceUnitTests",
   destination: 'platform=iOS Simulator,name=iPhone 7 Plus,OS=10.0',
   output_directory: "test_reports/",
   output_types: "html",
   fail_build: false
   )
  end
end
After running “bundle install” we should be able to run those test from command line like this :
$ bundle exec fastlane xcfit_ui_test
Once that done. We can have clear HTML reports genearted
XCFit: Swift Package Manager
XCFit will be having full on support for XCUI Test helpers so that we can use Apple’s XCUI Test Framework painless to use. There is sample swift package on Github to test XCFit Full Documetation and API implementation still in progress. You can grab it like this
import PackageDescription

let package = Package(
    name: "XCFit",
    dependencies: [
  .Package(url: "https://github.com/Shashikant86/XCFit.git", majorVersion: 2),
]
)
Quick Demo with Example App
You can clone the existing repo which has a demo app we can run Unit, Fitnesse and Cucumbertish Tests as XCTest
  $ git clone https://github.com/Shashikant86/XCFit
  $ cd XCFit/XCFit2Demo
  $ open XCFit2Demo.xcworkspace
Run Unit, Fitnesse and Cucumberish test with Xcode. “cmd + U”. We can execute it using Fastlane
$ bundle install
$ bundle exec fastlane xcfit_ui_test
Conclusion
With XCFit 2.o, we can get started with BDD within a minute using fully automated Xcode Templates using very popular Page Object Pattern. XCFit enables Full stack BDD in iOS.