Since Apple released Xcode 9 with inbuilt Xcode Server, the process setting up Continuous Integration for iOS projects became the matter of few clicks. In my previous post on Xcode Server, I explained the detailed process of setting up CI with Xcode 9 and Xcode Server for iOS apps. In order to understand the code signing, you should watch WWDC 2017 session on What’s New in Signing for Xcode and Xcode Server. Xcode Server has an option to produce an installable product as part of bot configuration which means Xcode Server creates an archive build and IPA for integration which can be downloaded in the iOS Devices within the network. In this post, we will cover common mistakes and solutions to those mistakes while installing the builds on iOS Devices from Xcode Server.
Common Mistakes
As Apple hasn’t finished the documentation of Xcode Server with Xcode 9 yet (at the time of writing this post), so getting the installed build on the iOS devices can be tricky and time-consuming sometimes if we don’t look at others experiences on Stack Overflow or Apple Developers forum. There are some tips and tricks to be used in order to get the builds on iOS devices without any pain. The common mistakes that most of the iOS team members are as follows.
- Using IP Address to access the Xcode Server, which can’t download build
- Lack of Access Control
- Forget to enable Xcode Server Certificate
- Using Domain names to access Xcode Server
- Wrong Code Signing options during Bot setup
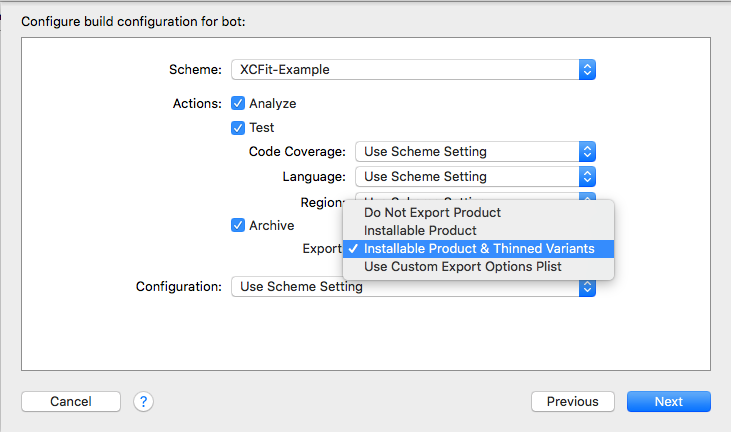
- Wrong Archive options during Bot setup
Those are top five common mistakes that iOS team members do while using Xcode Server for OTA installation. Now we will see some quick solutions for these common problems.
Xcode Server Tips
There are some tips and tricks that we can follow to avoid the common mistakes mentioned above. All of these I have faced myself while setting up Xcode Server with multiple Mac Mini servers. Hope this would be useful for others as well.
Use Canonical Hostname
As a normal user, it’s quite common to use IP address to access any machine in the network. It might not be an issue if you use other self-hosted iOS continuous integration servers like Jenkins, TeamCity etc. However, with Xcode Server, we can still access the Xcode Bots page but we can’t download an App on to the iOS Devices. You will get an error saying something like ” For Security reasons you cannot install using IP address, please use canonical hostname”. This means we have to find the canonical hostname of our Xcode Server.
Getting canonical hostname is very easy, if you have access to Xcode Server then SSH into Xcode Server machine and type hostname in the terminal.
|
1 2 |
$ ssh xcode_server_user@xcodeserver_ip $ hostname |
Or You can type following in your local machine terminal.
|
1 |
$ curl -k https://YOUR_XCODE_SERVER_IP:20343/api/hostname |
The both of above command will return the canonical hostname of the Xcode Server. We have to type this hostname in the iOS devices in order to download the build. e.g if your hostname is ABCXYZ then you have to type https://abcxyz/xcode/bots in your iOS devices. Ideally, you should have the server machine with good hostname from DNS. Usually, local machines have hostnames like XYZ's MacBook Pro.local which aren’t the great idea. Always use servers canonical name.
Install Xcode Server Profile and Certificate
Xcode Server comes up with its own SSL certificate and profiles that need to be installed on the iOS devices. The profile can be installed on the “Profile” tab integration page on the iOS devices. Clicking on the “Profile” tab will take you to the iOS settings and you can follow the instructions to install profile. You can also install profile by visiting Xcode Server API by visiting https://xcode_server_hostname:20343/api/profiles/ota.mobileconfigfrom iOS devices. Now that, we have Xcode Server profile installed but it’s not enough.
There is another very important step that most of us easily forget which is enabling the Xcode Server certificate manually from Certificates settings. We get annoying error cannot connect to server when we tap on Install button. Apple has made this changes from iOS 10.3 onwards. You can read more about this on Apple support page here. In summary, we have to follow these steps.
- Install self-signed certificate(s) from Xcode server’s bots page on your iPhone.
- Go to iPhone’s Settings->General->About->Certificate Trust Settings
- Find your server’s self-signed certificate(s) under section ENABLE FULL TRUST FOR ROOT CERTIFICATES and turn the switch ON.
- Visit bots page on Xcode Server, click install.
It would be a good idea to clear the safari cache and cookies, just in case you get the same error again. Sometimes Safari cookies confuse Xcode Server.
Set Permissions
Xcode Server has an option to set permissions who should access the server page. By default, everybody in the network can visit the bot page can trigger integrations. Ideally having the access control is a good idea so that only people with credential can access the bots. We can set up that from Xcode Server permissions settings and add only those users who can access the Xcode Server bots.

Avoid Using Domain Names
Xcode Server can also be accessed by using the domain names such as https://abcxyz.london.my_company.com but using domain names we can only access Xcode Server page but we can not install build on the iOS devices. As mentioned above, we just have to use the canonical hostname in the URL to access the Xcode Server page and download builds.
Code Signing
While setting up bot with Xcode 9, we have a separate dedicated tab for Code Signing. In the bot configuration, we can add the server to the team so that Xcode Server can automatically handle the code signing by clicking Allow Xcode Server to manage my certificates and profiles but sometime you may get Archive Failed error. It may be because Xcode Server doesn’t have enough details about provisioning profiles needed to code sign iOS app. There is hack mentioned here where we need to turn off automatic code signing and download all the provisioning profiles using Fastlane sigh in the pre-integration script.
Archive Options
Xcode Server gives us multiple options while archiving an iOS app during the Bot setup. Some of the options are

There is three different option to create an archive from your schemes. We have to chose which option is suitable for our Xcode Bot.
- Installable Product: This will create only one IPA file
- Installable Products & Thinned Variants: This creates multiple IPA files and takes lot of disk space
- Use Custom Export Options Plist: This option needs our own Plist file
It would be the great idea to select Installable products for on commits builds another option for release builds in order to save some disk space on the server.
Conclusion
Getting the iOS builds on the devices from Xcode Server at the moment but following some tips, tricks and other users experience can make it possible. Well, it feels very nice to get those builds on devices from self-managed Xcode Servers rather than using third-party services like Fabric, HockyApp, TestFairy etc. What are your experiences using Xcode Server for Over the Air installation? OKish, Great, It Sucks whatever it is, Share your experiences in the comment.

