Swift is truly protocol-oriented language. Since introduced in WWDC 2014 and open sourced in December 2015, it become one of the popular language for developing iOS application. You can watch this WWDC video to know about protocol oriented programming with Swift. In the recent days, protocol-oriented approach is definitely dominated the object oriented approach at least for Swift. It means we have to gradually forget about writing classes and start writing protocols instead. In this detailed and step by step blog post, we will see how to drive development from behaviour a.k.a BDD using Swift protocols, extensions and enumerations.
BDD+Swift+XCTest
Behaviour Driven Development a.k.a BDD in the Swift or iOS development world is always challenging because of lack of proper BDD tools like Cucumber for Ruby, SpecfFow for .NET or Behat for PHP. There is a Swift library XCTest-Gherkin from Net-A-Porter group and objective-C library Cucumberish from Ahmed Ali which are available for iOS development to achieve BDD but they are not as powerful as from other languages. It’s still possible to make great use of Swift features like protocols, extensions and enumerations while writing acceptance tests or doing Behaviour Driven Development a.k.a BDD. We will explore that option in details in this post.
BDD Concepts
Just in case, you are new to BDD a.k.a Behaviour Driven Development is a process of bridging the communication gap between technology and business people using the same language so that business people can contribute to specification and programmers can use those specification to write the code.
BDD is a term coined by Dan North to overcome the pitfalls in Test Driven Development and bridge the communication gap between business and technology. In a summary, it works like this:
- Write some user stories collaboratively with team.
- Capture the intended behaviour in the form of features BEFORE writing any code. [Specification By Example]. Refer story format here
- Think of all possible scenarios that cover the intended functionality, reducing the risk of creating bugs. Write scenario title and write steps in domain specific language (DSL) or human readable format like Gherkin (Given When Then)
- Implement the behaviour in the form of step definitions. You can refer step definition sample here
- Passing scenarios verify that the implementation of the behaviour has been successful.
I assume that you probably aware of BDD process and we will jump straight into the topic.
Protocol Oriented BDD
At this point, we got basic BDD concepts, let’s apply those principle in Protocol Oriented way.
- Write a requirements collaboratively with team anywhere in JIRA, Spreadsheet or similar.
- Capture intended behaviour in the form of Swift Protocol which is similar to Features format in Gherkin.
- Think of all possible scenarios in the form of XCTest test methods which is similar to scenario titles in the Gherkin.
- Write a XCTest class confirming to protocol means we need to implement all the requirements in our tests.
- Write a steps in the form of methods inGiven/When/Then a.k. a GWT like format e.g givenIAmOnTheHomeScreen()
- Implement Steps as an extension to the protocol defined for the particular feature.
- Abstract UI elements in the form of enumeration for the particular feature.
Now that, we got an idea how to implement BDD steps in the protocol-oriented way. Let’s dive in to the code
Protocol Oriented BDD in Action
Let’s build an app which greets user when user press Greet button, using protocol-oriented BDD approach. The app has following main requirements.
- App should have home screen with Greet button
- When user press Greet button, user should see welcome message ‘Welcome to POP’
That’s very simple application. It’s time to dive into Xcode to build this app.
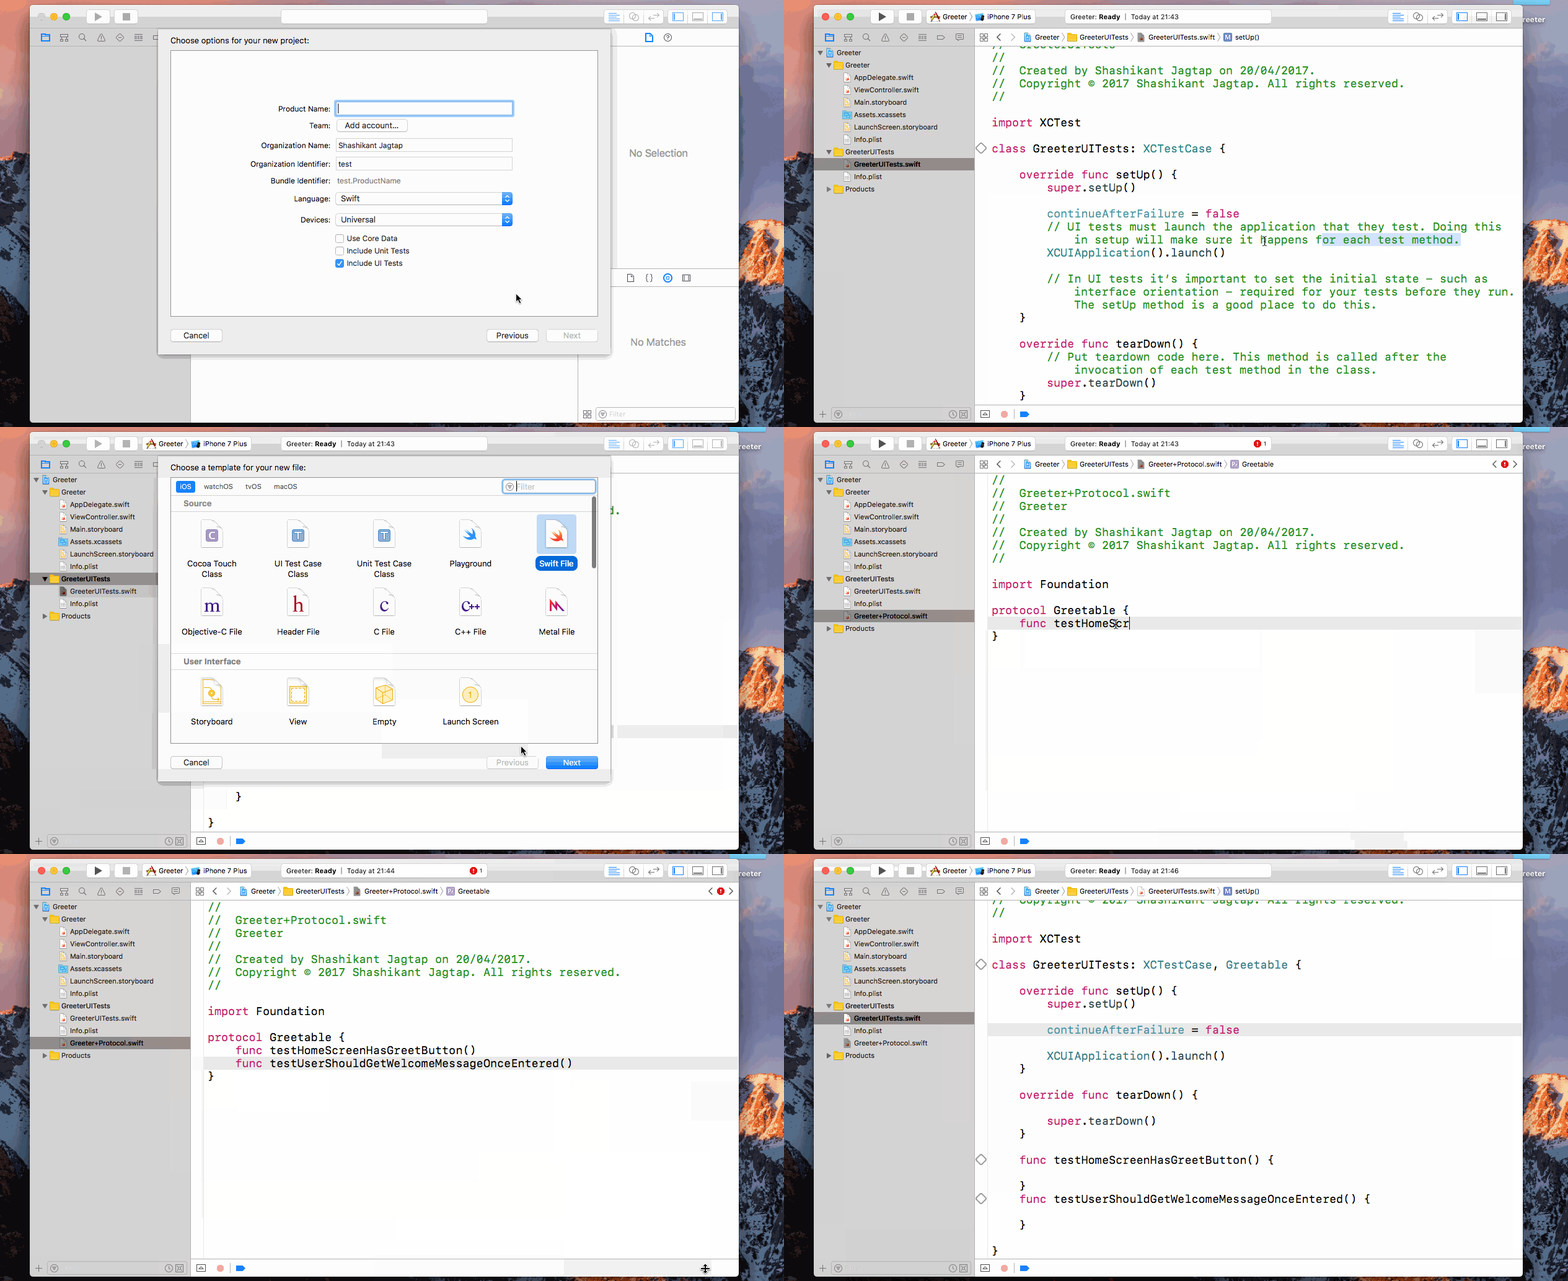
- Fire up Xcode and create new project -> iOS -> Single View Application
- Name application as ‘Greeter’
- Select the box ‘Include UI Tests’
- Open The GreeterUITest.swift file and delete the comments to make it bit cleaner
Write a Protocol
Now that, we have template code for our new app. We also have our requirements ready. Let’s write a protocol in the UI test target so that we can list all the requirements for the Greeter feature. Create a new file called Greeter+Protocol.swift and add our requirements.
|
1 2 3 4 5 6 |
protocol Greetable { func testHomeScreenHasGreetButton() func testUserShouldGetWelcomeMessageOnceEntered() } |
Let’s make our test GreeterUITest.swift to confirm to Greetable protocol, that means we must have those methods in the XCUITest class in order to compile the test target. Let’s add them so that our test file will look like this:
|
1 2 3 4 5 6 7 8 9 10 11 12 13 14 15 16 17 18 19 20 21 22 |
import XCTest class GreeterUITests: XCTestCase, Greetable { override func setUp() { super.setUp() continueAfterFailure = false } override func tearDown() { super.tearDown() } func testHomeScreenHasGreetButton() { } func testUserShouldGetsWelcomeMessageOnceEntered() { } } |
What we have done so far, watch the GIF below.
Write Given/When/Then Steps in extension
At this point, we wrote scenario titles in terms of XCTest methods. Now, it’s time to write Given/When/Then a.k. a GWT and start implementing it. Remember, we don’t have to follow Gherkin syntax here, feel free to use any format similar to GWT. We don’t necessarily follow Gherkin syntax. We will write some GWT in the test methods which looks like this:
|
1 2 3 4 5 6 7 8 9 10 11 |
func testHomeScreenHasGreetButton() { givenTheAppIsLaunched() thenIShouldSeeGreetButton() } func testUserShouldGetWelcomeMessageOnceEntered() { givenTheAppIsLaunched() whenITapGreetButton() thenIShouldSeeWelcomeMessage() } |
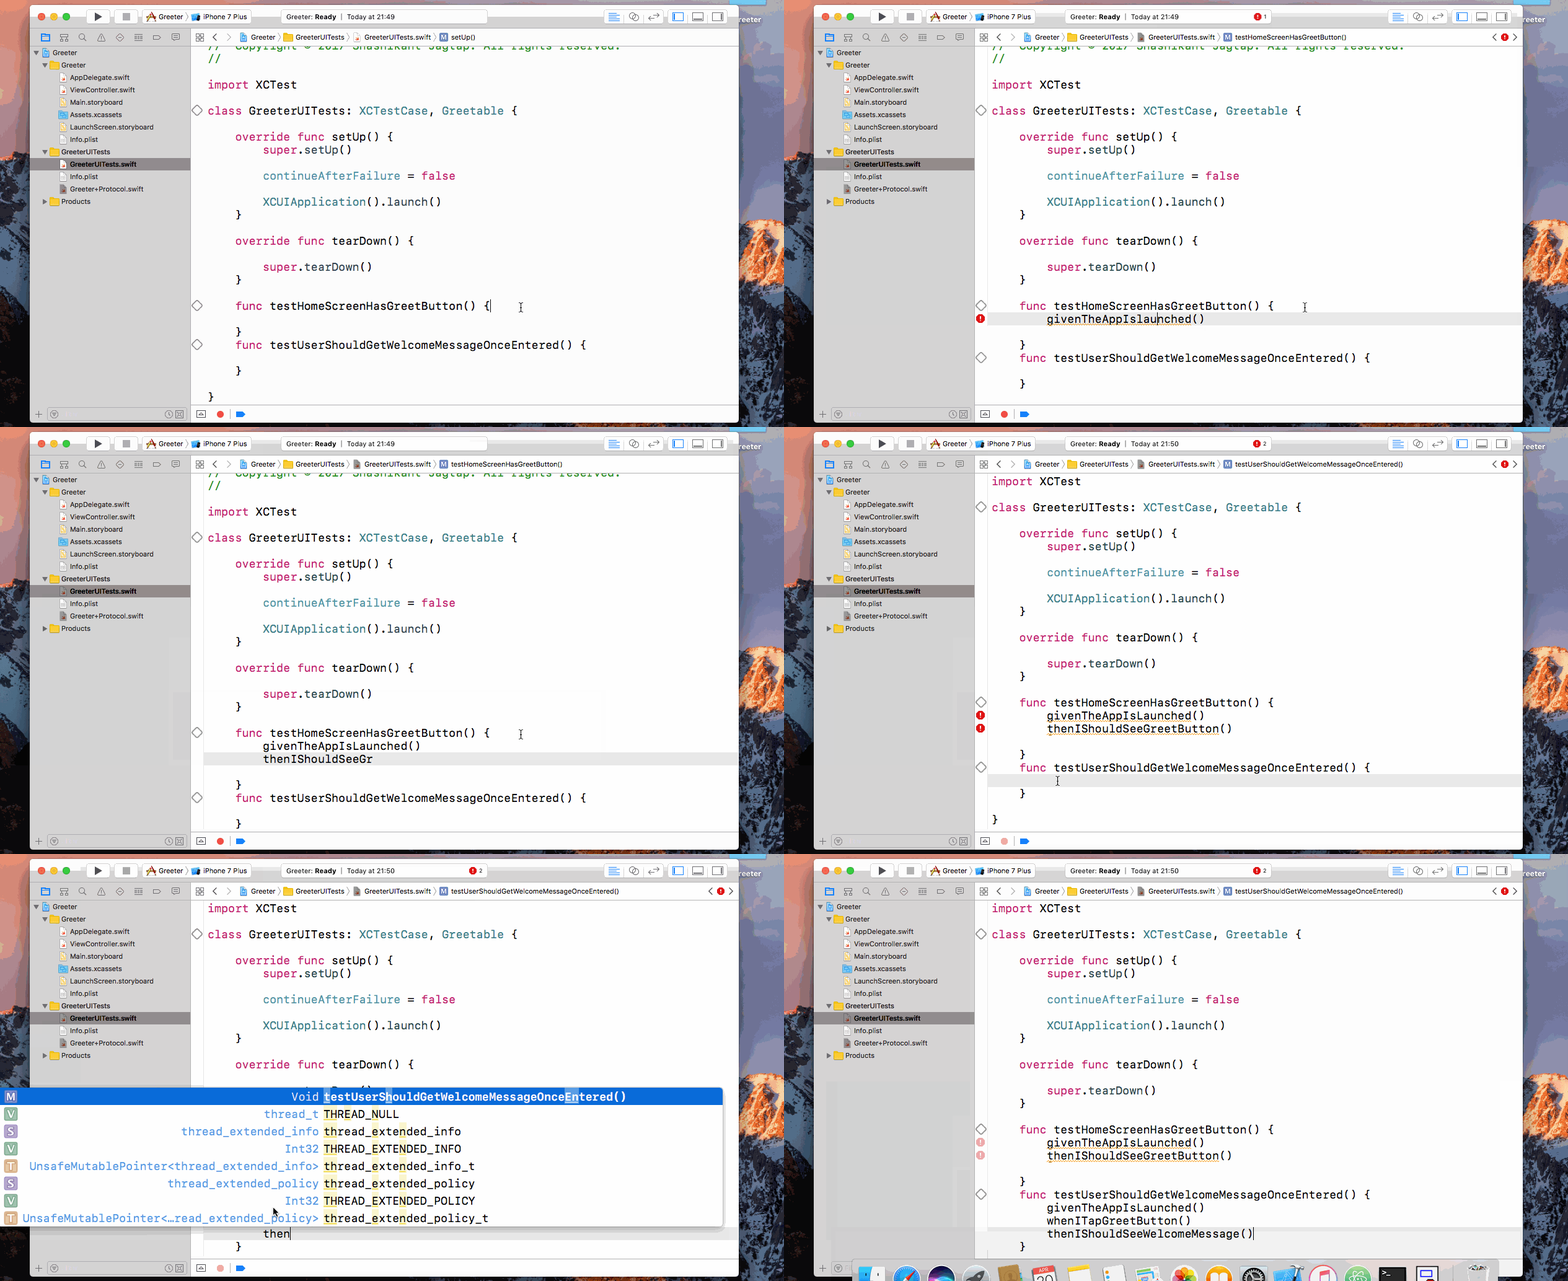
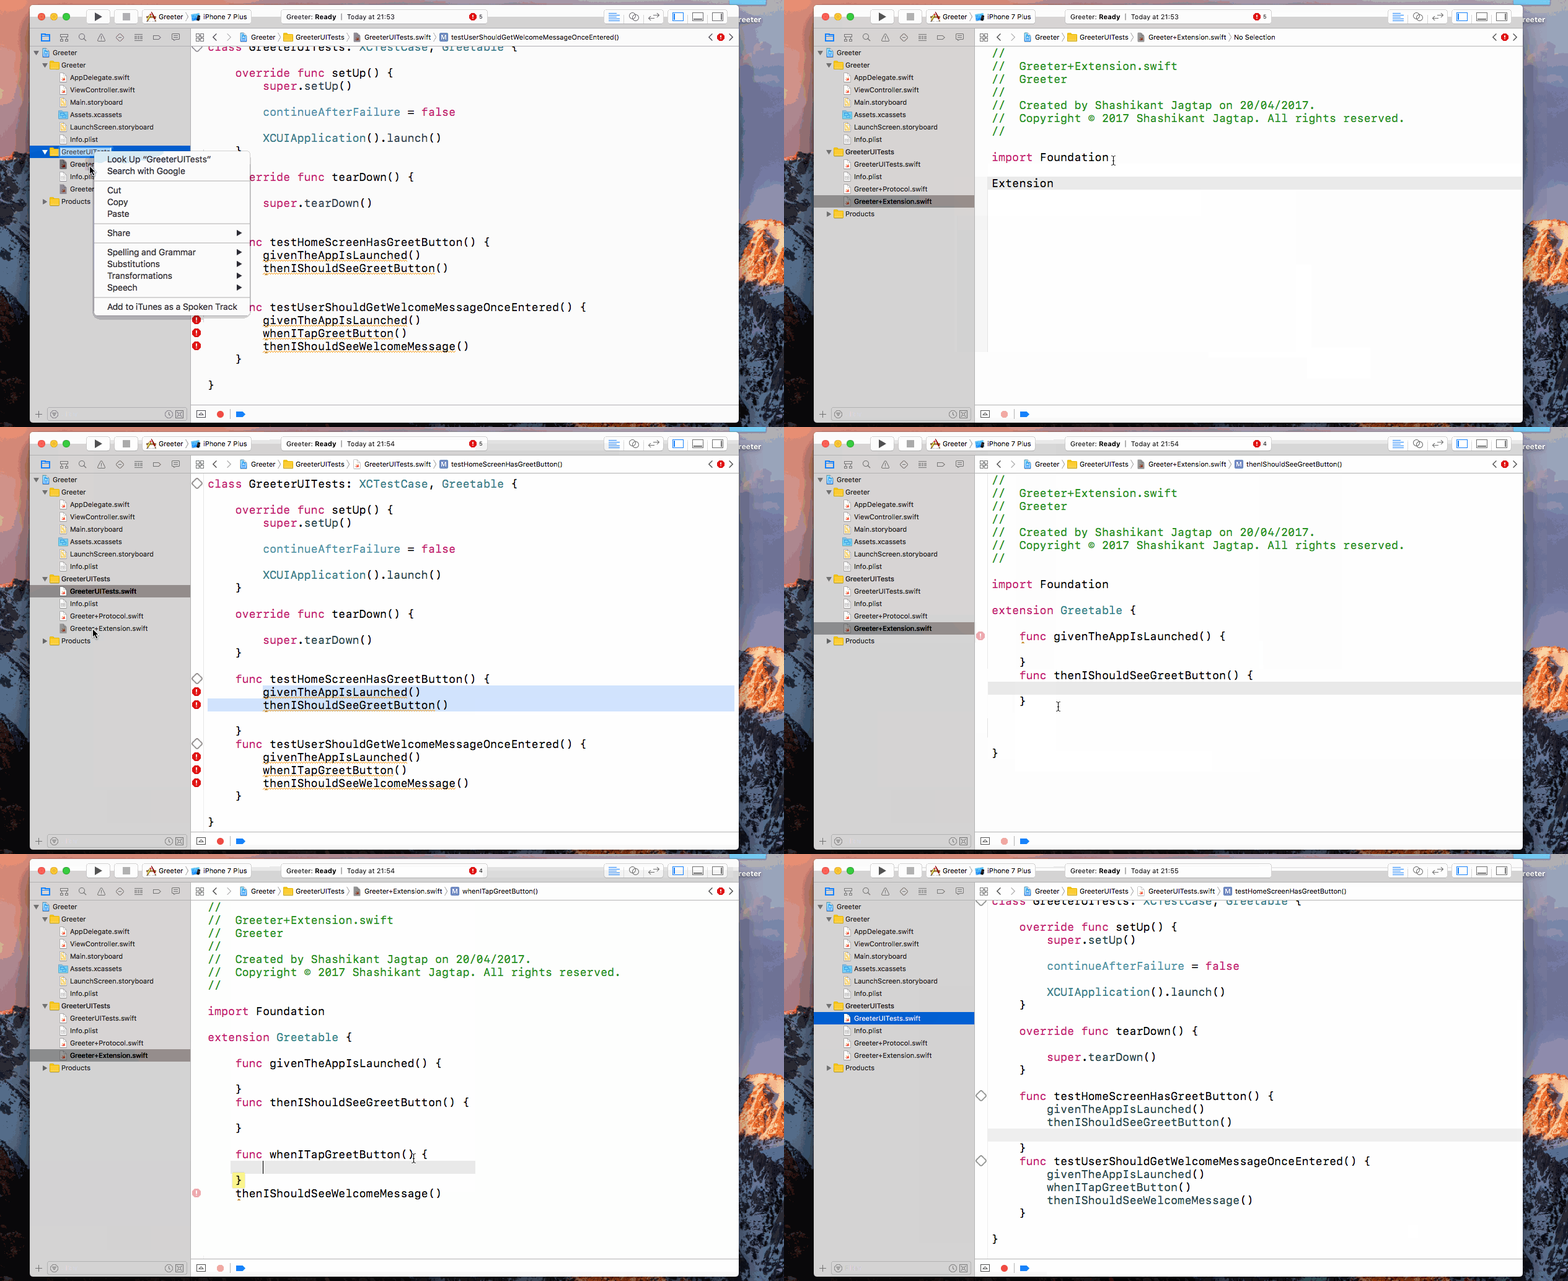
Now that, we have our GWT are ready but our test target will still not compile as we have to implement these steps. As discussed earlier, we will be using Swift Extensions to implement step definitions. It’s good time make use of them to implement steps as an extension to the Greetable protocol. Let’s create a Greeter+Extension.swift file add extension to Greetable protocol with empty methods for GWT like this :
|
1 2 3 4 5 6 7 8 9 10 11 12 13 14 15 16 17 18 19 20 21 |
import XCTest extension Greetable { func givenTheAppLaunched() { } func thenIShouldSeeGreetButton() { } func whenIPressGreetButton() { } func thenIShouldSeeWeocomeMessage() { } } |
Use XCUI API to drive behaviour from GWT
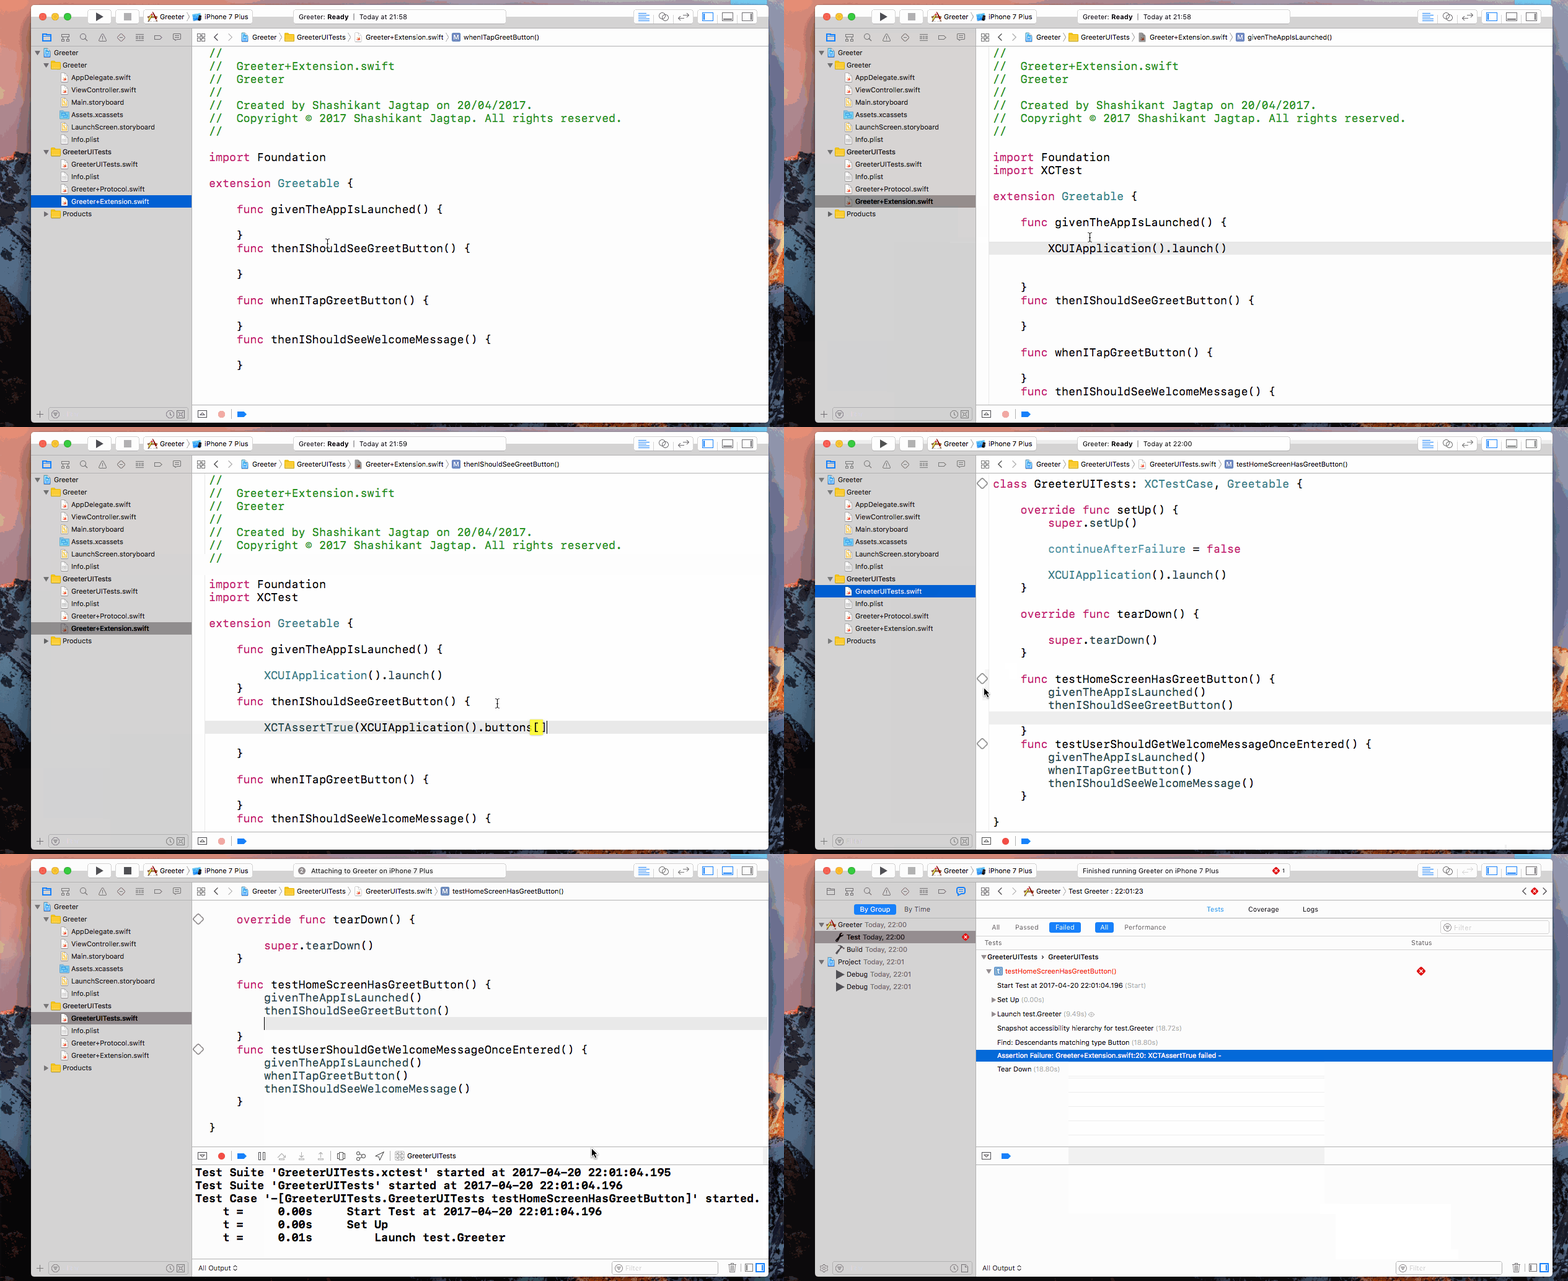
At this stage, our target should compile but it’s not doing anything at the moment. We will drive the behaviour for the first scenario using XCUITest API for launching app and check if button exist. The sample code for these will look like this :
|
1 2 3 4 5 6 7 |
func givenTheAppLaunched() { XCUIApplication().launch() } func thenIShouldSeeGreetButton() { XCTAssertTrue(XCUIApplication().buttons["Greet"].exists) } |
Let’s try to execute the test testHomeScreenHasGreetButton() from Xcode Test navigator. We will see that first step for launching an app will pass but second one for Greet button will fail. It’s true because button with accessibility identifier ‘Greet’ doesn’t exist yet.
Implement the Behaviour to make Steps Pass
Let’s implement button in the app in order to make this test pass. Follow the steps below
- In the Main.Storyboard drag an button, add accessibility identifier as ‘Greet‘.
- Click on the Assistance Editor to bring the ViewController.swift
- From the storyboard, select button and press CTL + Drag it to view controller class
- Select ‘Action’ as connection and name the function as ‘GreetUser’
Now that we have a button on the home screen with accessibility identifier ‘Greet’ which isn’t doing anything but our first scenario checks existence of the button. Let’s run the first scenario from Xcode and Watch that Test is passing !
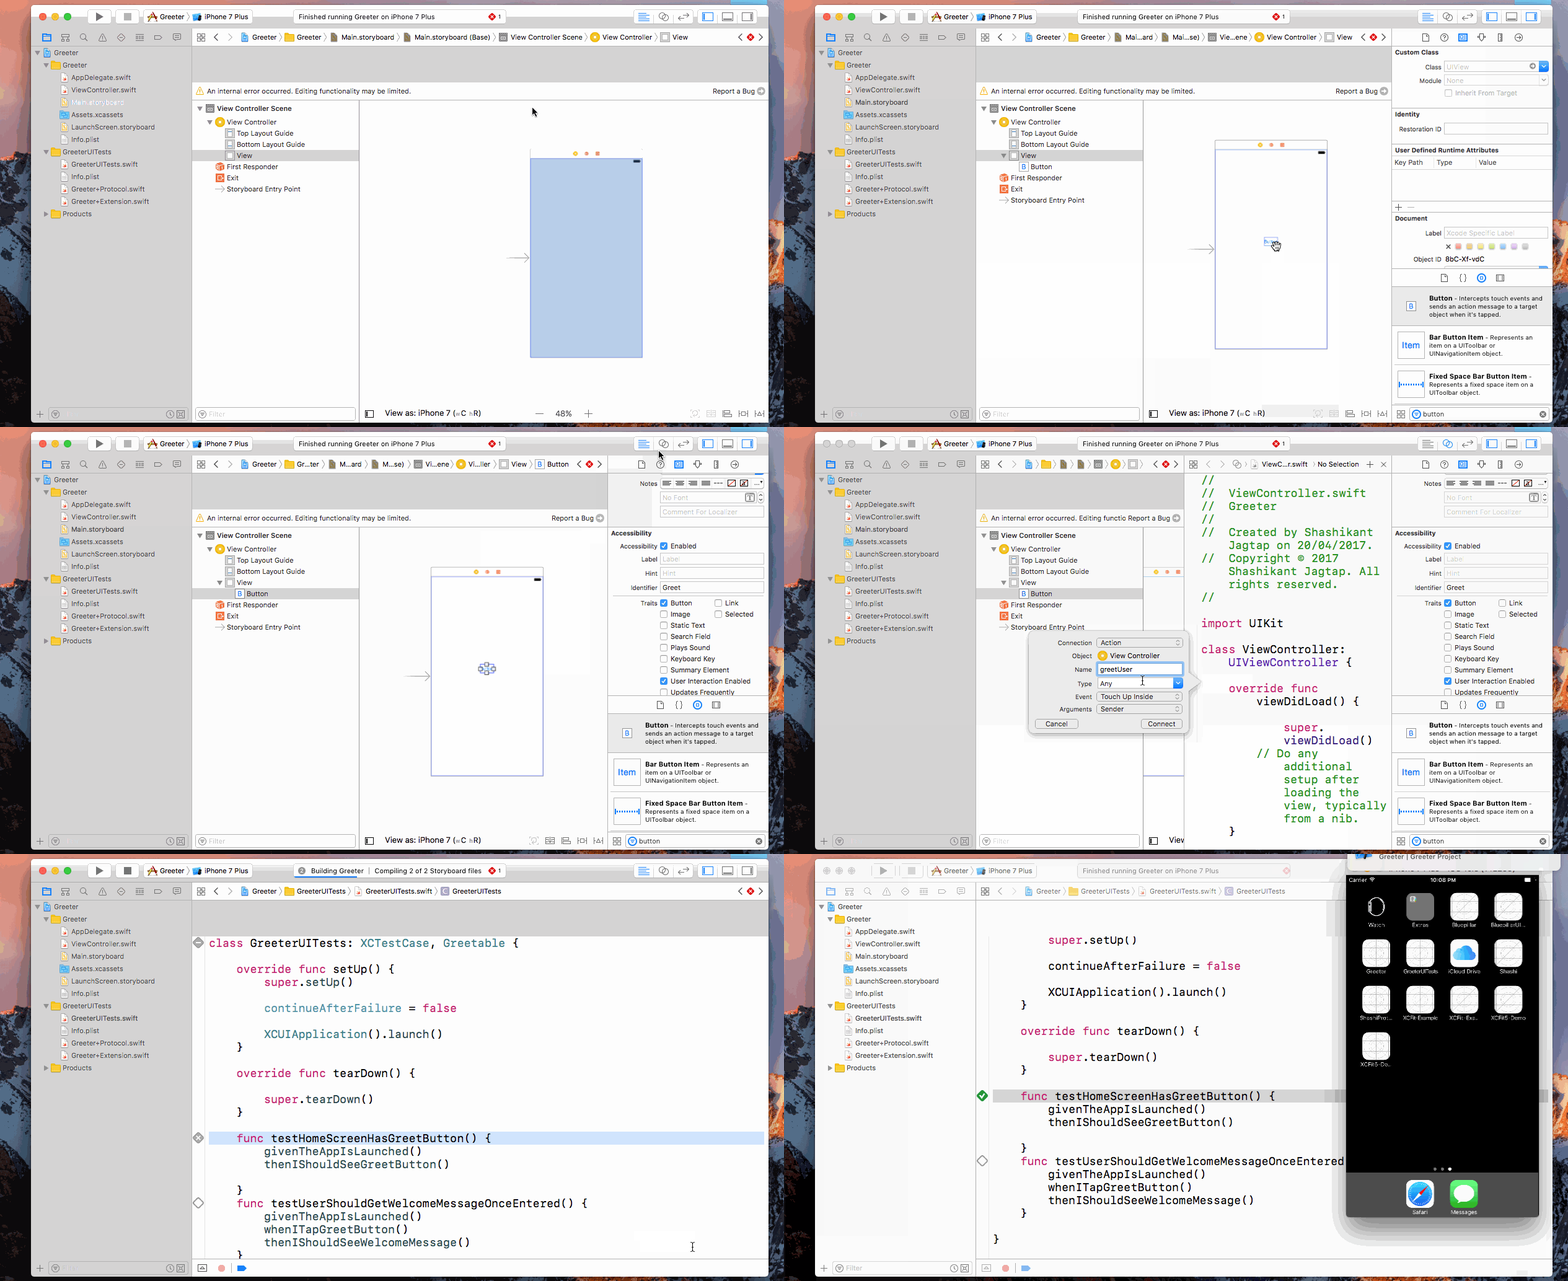
Congratulations ! You have implemented your first scenario using protocol-oriented BDD approach. Let’s carry on and implement other scenario too.
In the second scenario, we have to tap the button and once button is tapped user should see message ‘Welcome to POP’. In our extension, there is step to tap the button and display the message. Add following code to this steps
|
1 2 3 4 5 6 7 |
func whenITapGreetButton() { XCUIApplication().buttons["Greet"].tap() } func thenIShouldSeeWelcomeMessage() { XCTAssertTrue(XCUIApplication().staticTexts["Welcome to POP"].exists) } |
Now try to execute second scenario, you will observe that first step will pass as we have button with accessibility identifier ‘Greet’, It will tap on the button and look for the message text ‘Welcome to POP’ but it will fail. It’s true because we haven’t implemented that welcome message yet.
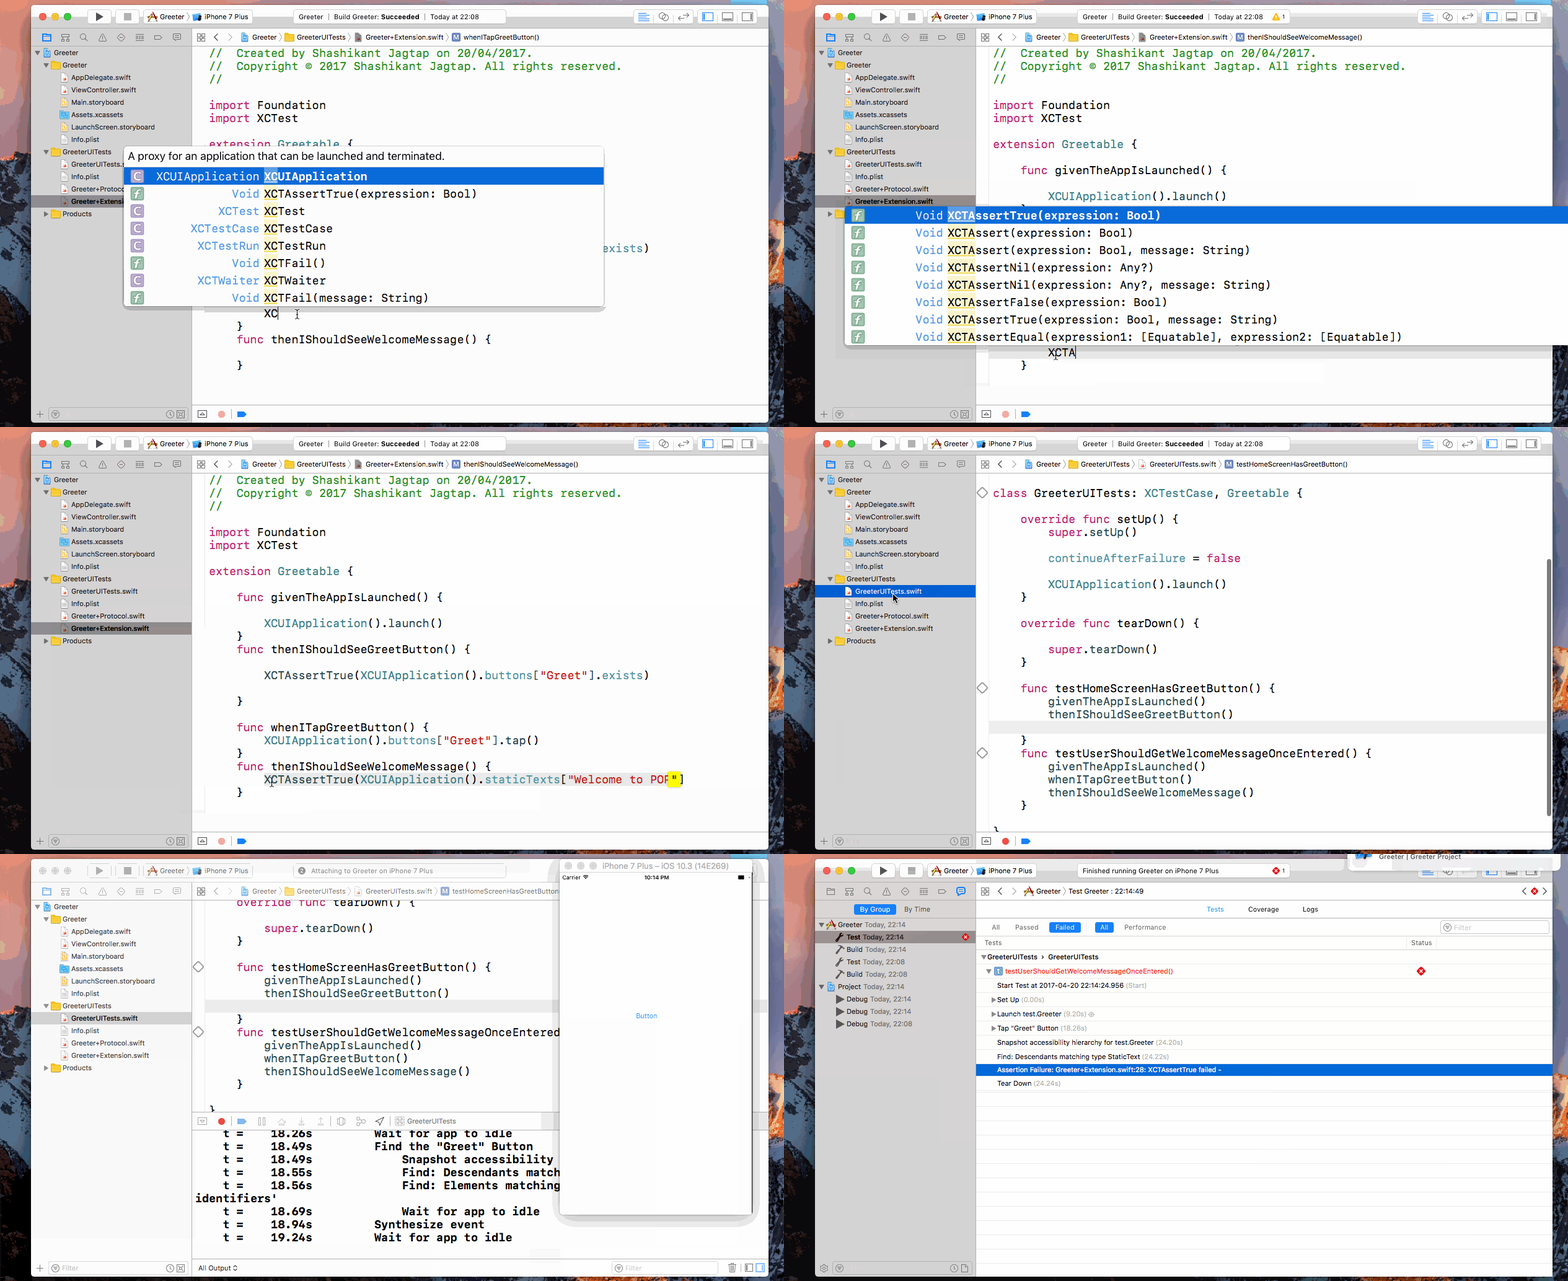
In order to make the second scenario pass, we have to implement the welcome message. Follow the steps to do that
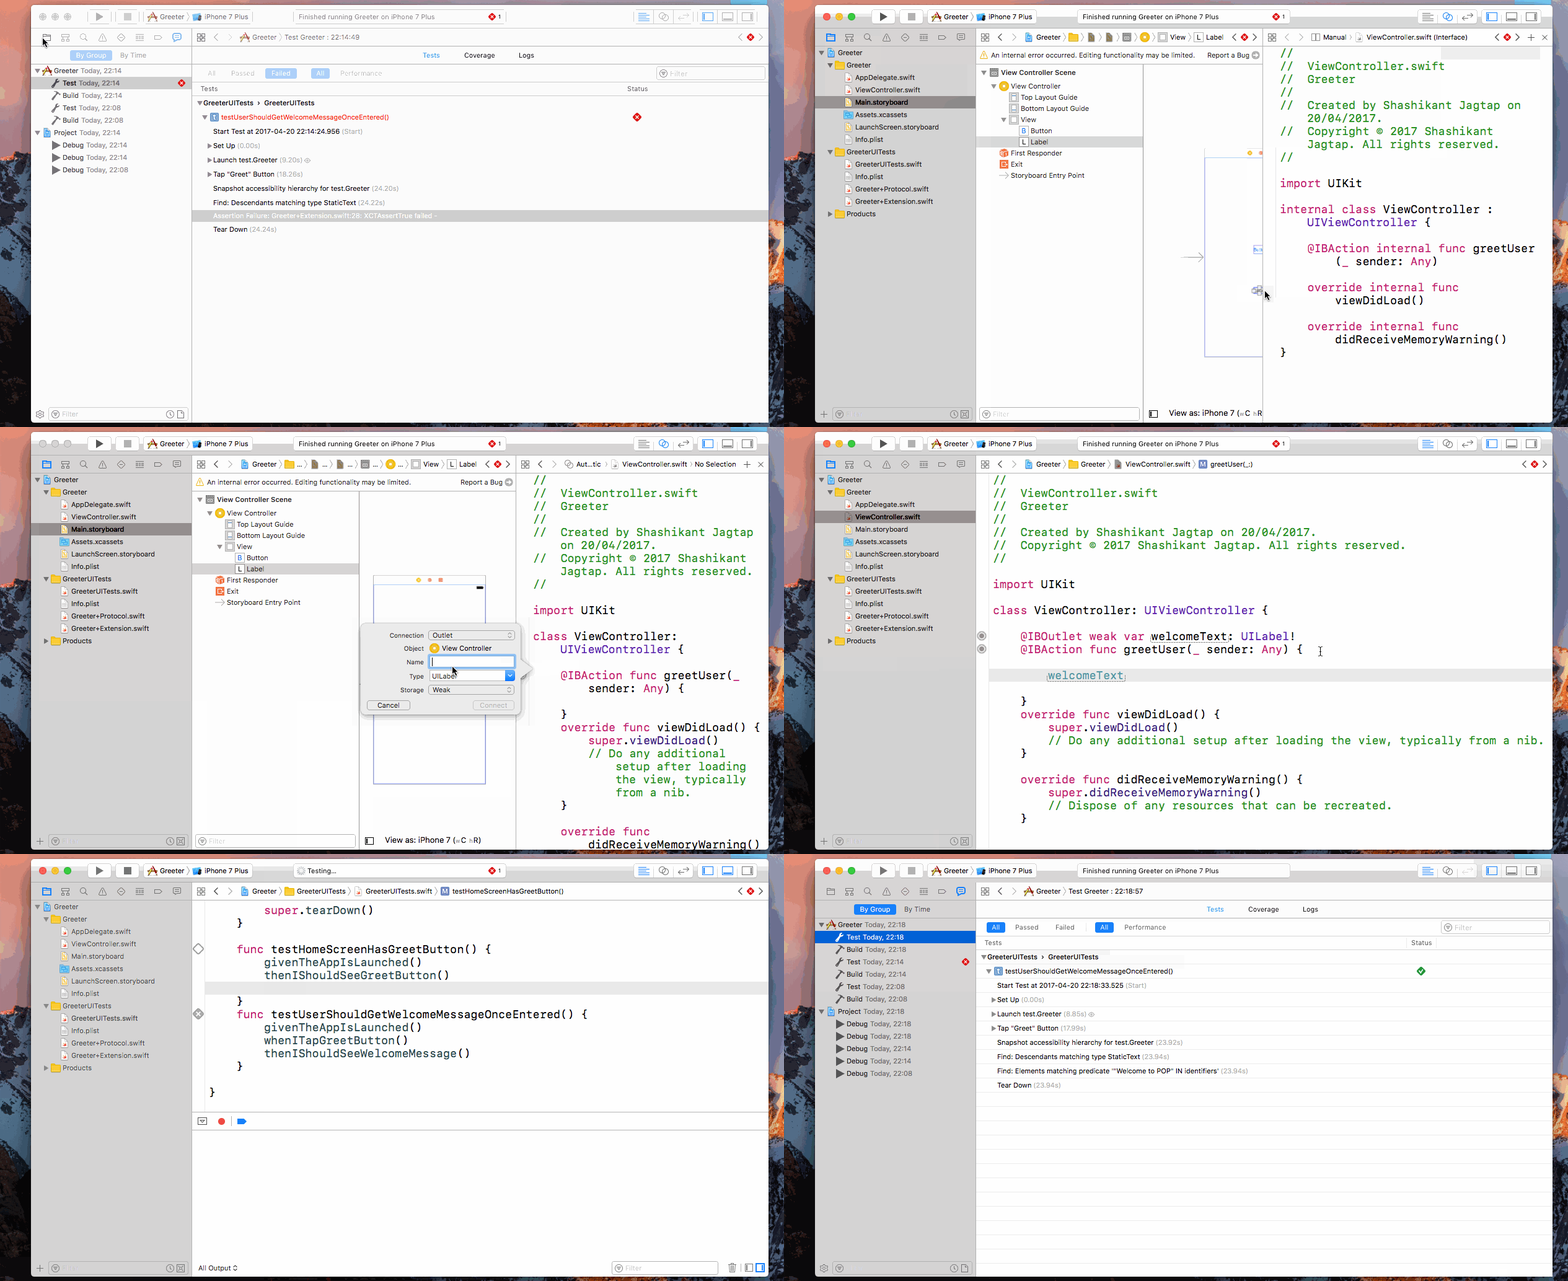
- In the Main.Storyboard add the label
- Bring up view controller using Assistance Editor
- CTL + drag the label to View Controller, selection connection as Outlet and name it as WelcomeText
Now that, we have our label in place, we have to tell the button that when button is pressed then label should change to text ‘Welcome to POP’. Add the following code the function associated with button.
|
1 2 3 4 5 6 |
@IBOutlet weak var welcomeText: UILabel! @IBAction func greetUser(_ sender: Any) { welcomeText.text = "Welcome to POP" } |
That’s it ! Now execute the second scenario from Xcode and you will see it’s passing.
Watch it in action :
Refactor Elements using Enumerations
We have implemented all the features using protocol-oriented BDD approach. It’s time to refactor and tidy the things up.
In the Greeter+Extensions.swift file, we have placed XCUIElements randomly. We can use Swift Enumarations to store all the elements for that particular feature. Let’s create a new file Greeter+Enum.swift and store button and static text.
|
1 2 3 4 5 6 7 8 |
import XCTest enum GreeterElements { static let greetButton = XCUIApplication().buttons["Greet"] static let welcomeText = XCUIApplication().staticTexts["Welcome to POP"] } |
We can use those elements in the extensions so that our steps become more readable and looks like this :
|
1 2 3 4 5 6 7 8 9 10 11 12 13 14 15 16 17 18 19 |
import XCTest extension Greetable { func givenTheAppIsLaunched() { XCUIApplication().launch() } func thenIShouldSeeGreetButton() { XCTAssertTrue(GreeterElements.greetButton.exists) } func whenITapGreetButton() { GreeterElements.greetButton.tap() } func thenIShouldSeeWelcomeMessage() { XCTAssertTrue(GreeterElements.welcomeText.exists) } } |
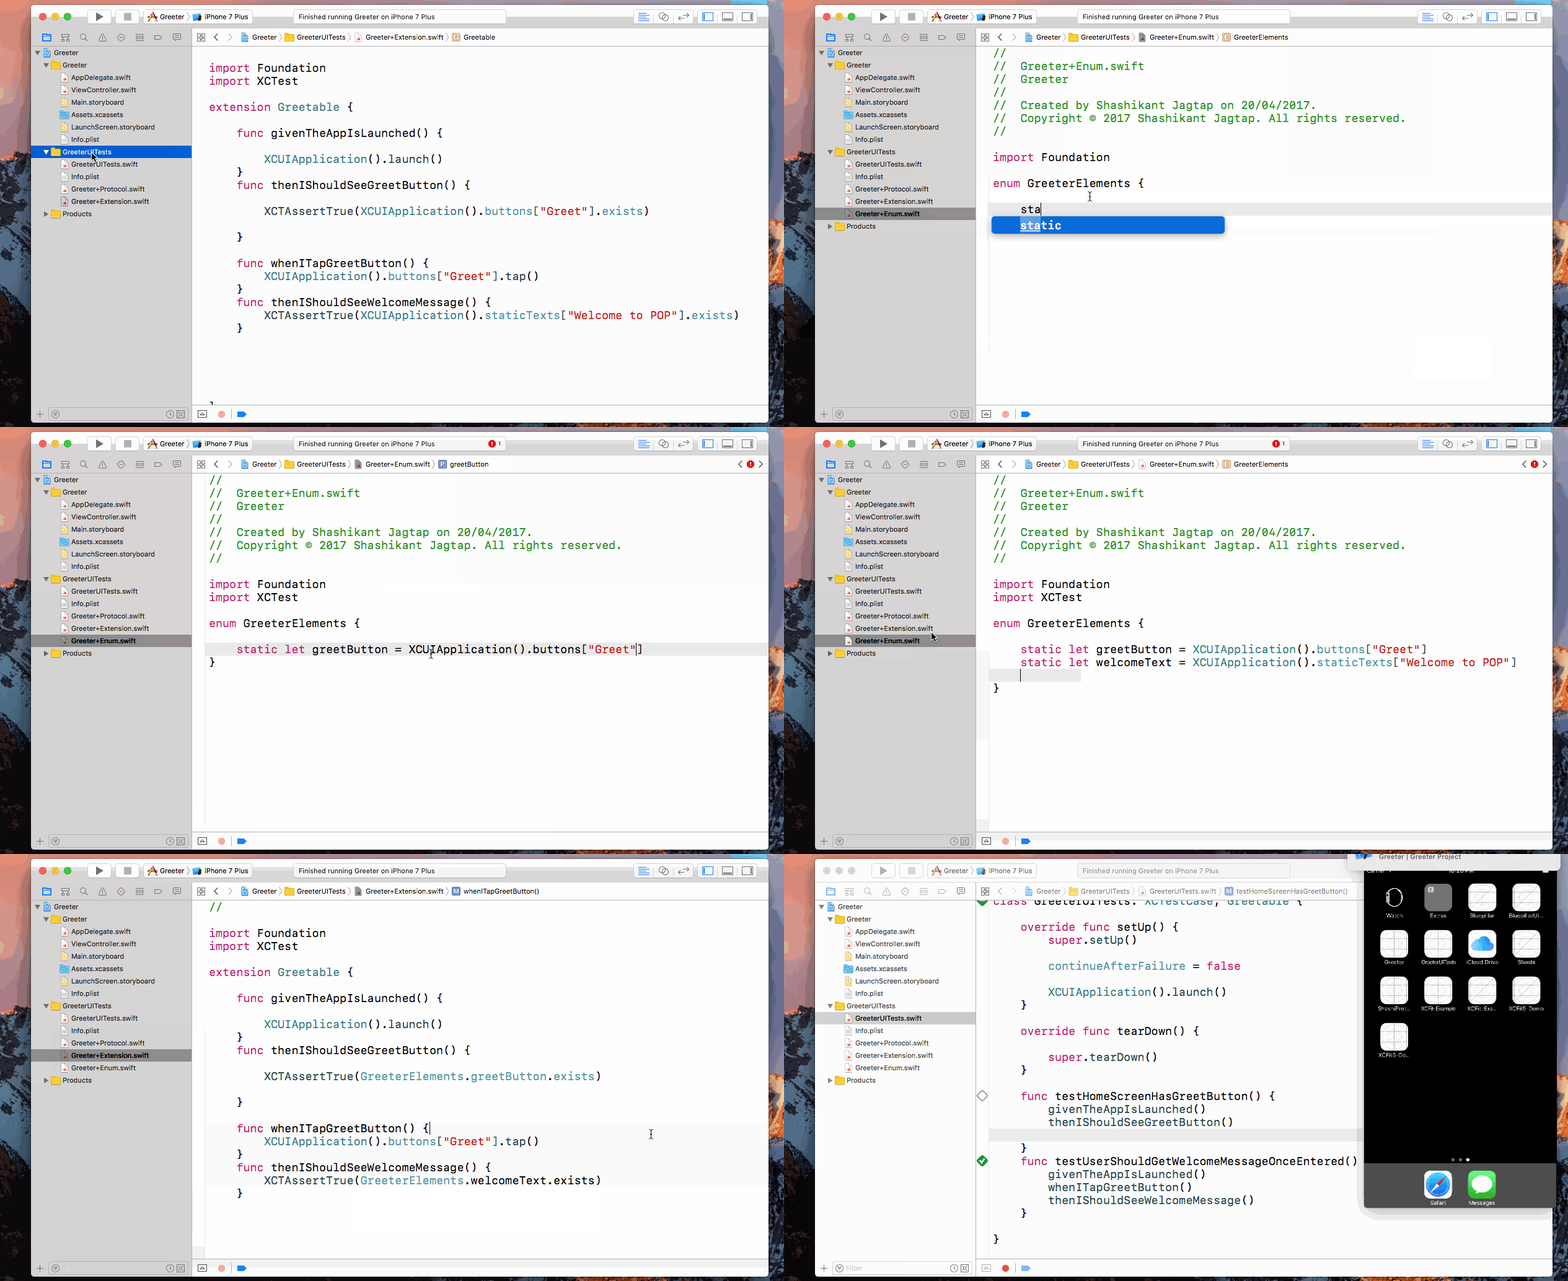
Now that, we have reached to the point where we can do BDD using Protocol, Extensions and Enums, however we have performed lot of steps to achieve this. It would be great if we can quickly setup the framework code and get going with BDD. XCFit is the solution to get started quickly. In this section, we will see how we can save time by using XCFit templates and pre-defined steps.
Automate Protocol Oriented BDD using XCFit
XCFit is a full stack BDD framework for the iOS applications, It provides automated Xcode template as well as pre-defined steps. You can install XCFit templates package using RubyGems or HomeBrew. Let’s use Rubygems for now
|
1 |
$ sudo gem install xcfit |
Use automated XCFit Xcode Templates
XCFit has automated Xcode templates which provide skeleton code for the protocol-oriented BDD. The templates with Xcode Groups and required code can be downloaded using command
|
1 |
$ xcfit setup_xcode_templates |
Now that, we have XCFit Xcode templates installed which can be used inside app as new targets. In our Greeter app, select File->New->Target choose iOS and you will see new targets available there. Select ‘Protocol BDD’ for the Protocol Oriented BDD and give it name or keep it default as GreeterProtocolBDDTests. You will see the template code is automatically generated us. You probably need delete XCUI Template test file YOUR_TARGET_NAME_Test.swift as we won’t be using this file.
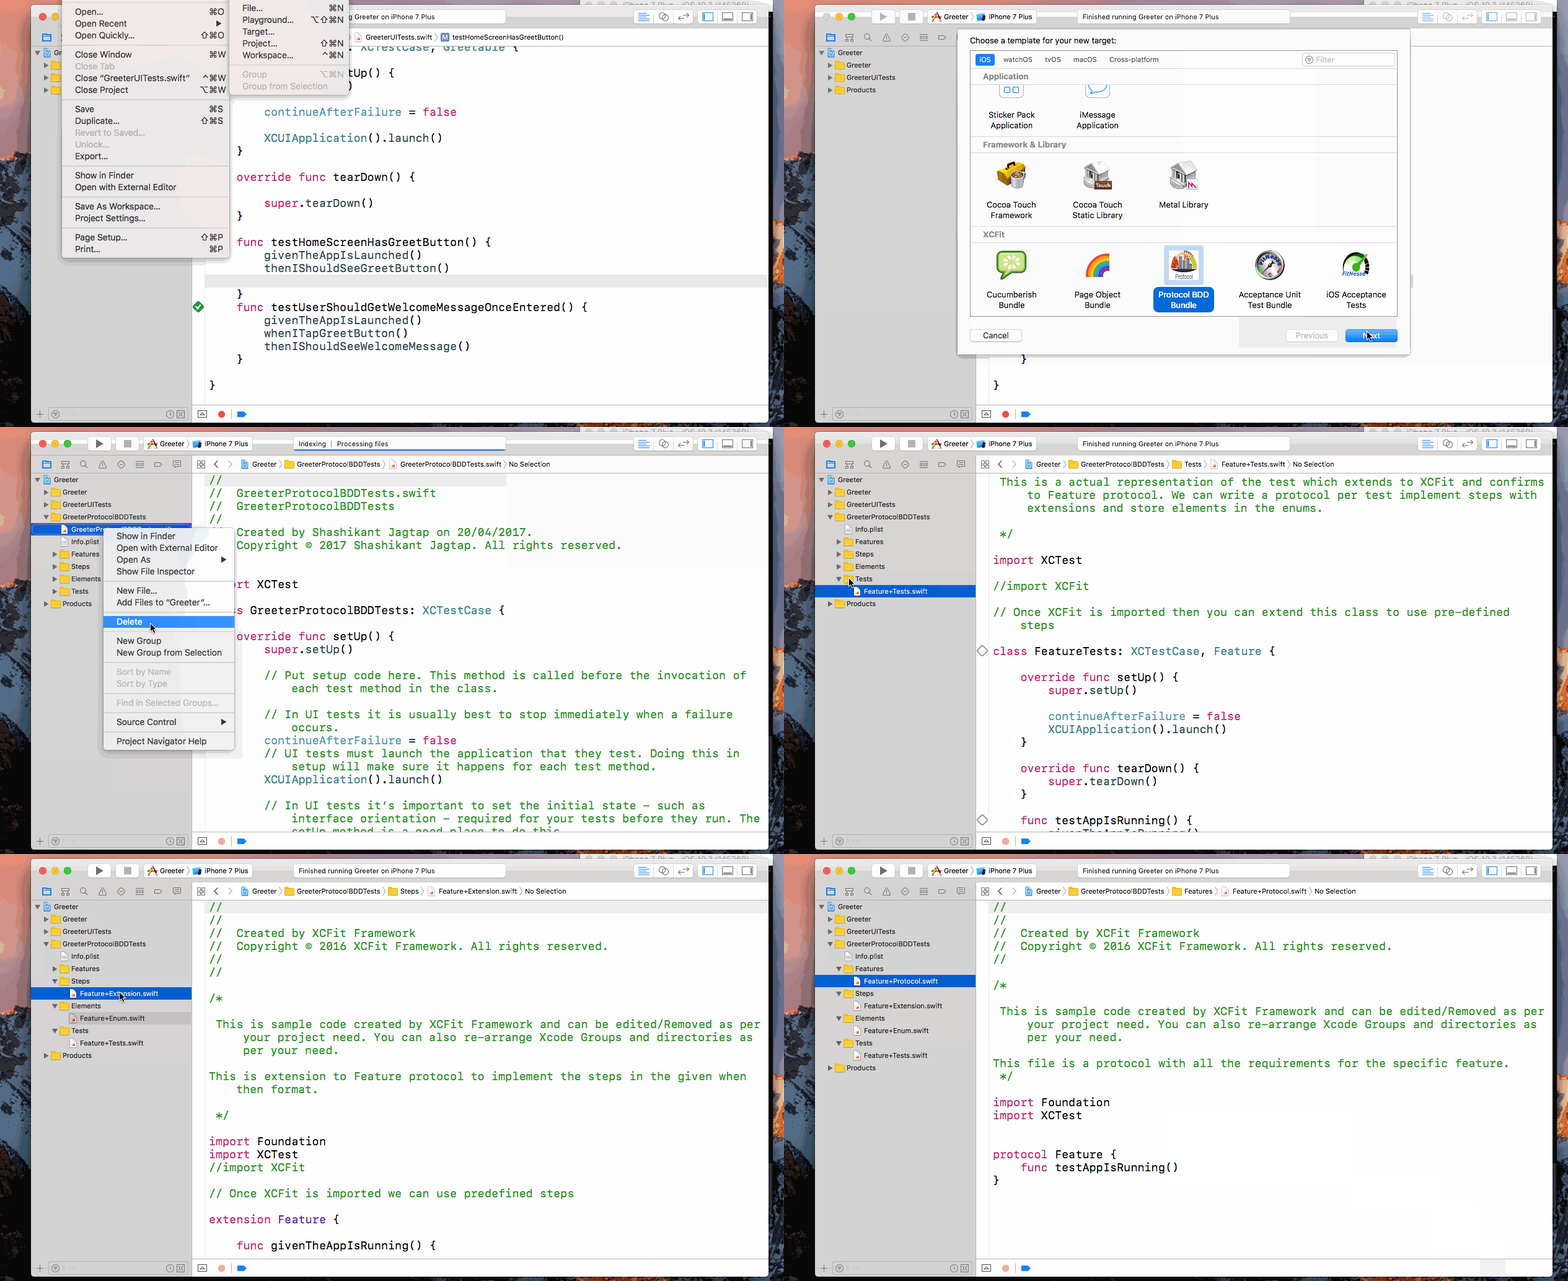
Now, rename the template file to use Greeter feature, so we need to rename following file in the newly created target
- Feature+Protocol.swift –> Greeter+Protocol.swift
- Feature+Extension.swift —> Greeter+Extnsion.swift
- Feature+Enum —-> Greeter+Enum.swift
- Feature+Test.swift —> Greeter+Test.swift
replace the template code with the code we implemented above and we will see the test are still passing for the new XCFit target.
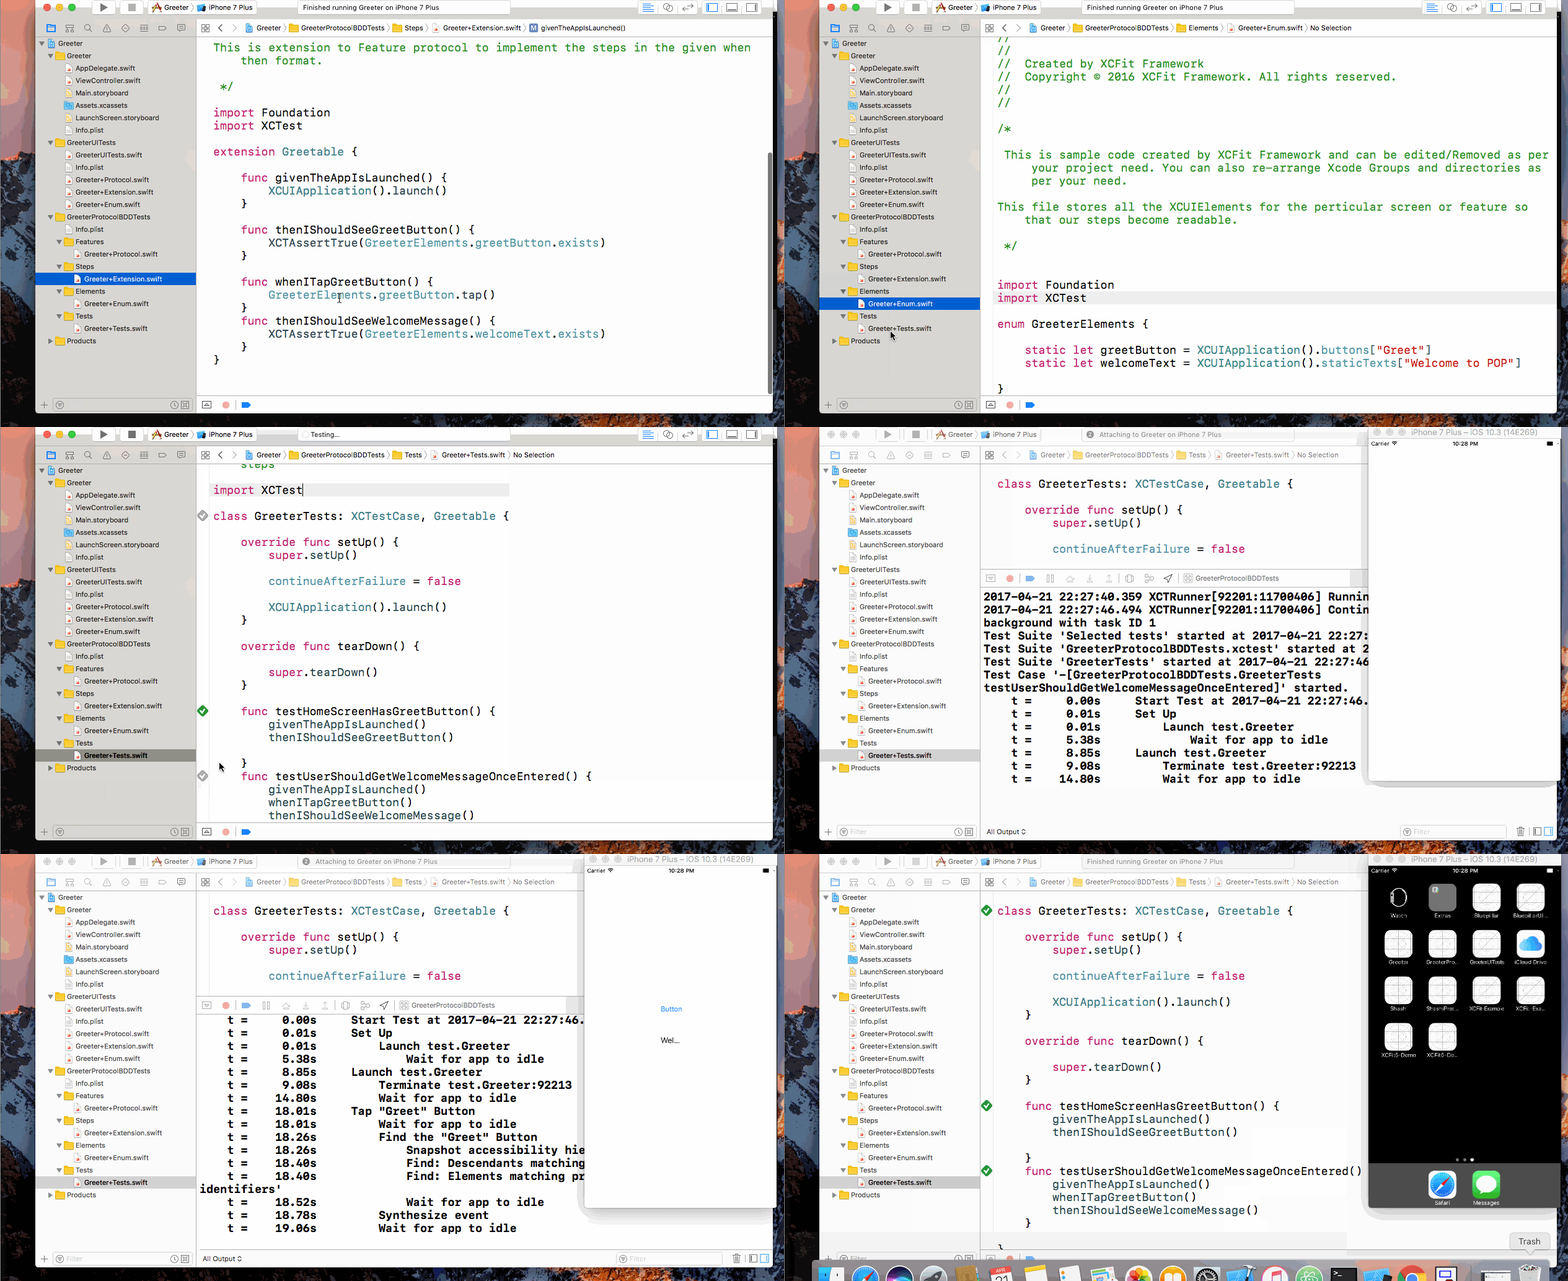
Use Pre-defined Steps from XCFit
XCFit Swift framework provides lots of pre-defined steps that can be used straightaway into the test with no need for implementation. It means step definitions are already implemented for us so we don’t need to write extensions. In order to use pre-defined steps, we need to import XCFit Swift framework into our target. Let’s use GreeterProtocolBDDTests target for that. We can either use CocoaPods Or Carthage to import XCFit. You can find detailed explanation on how to do this here. We will use CocoPods here. We can generate template Podfile using XCFit command
|
1 |
$ xcfit setup_xcfit_podfile |
This will setup Podfile in our project, we need to replace PROTOCOL_BDD_TARGET = “GreeterProtocolBDDTests”. Make sure unwanted targets in the Podfile are commented. Now we can install dependencies using
|
1 |
$ pod install |
We have to close the current Xcode session and open Greeter.xcworkspace
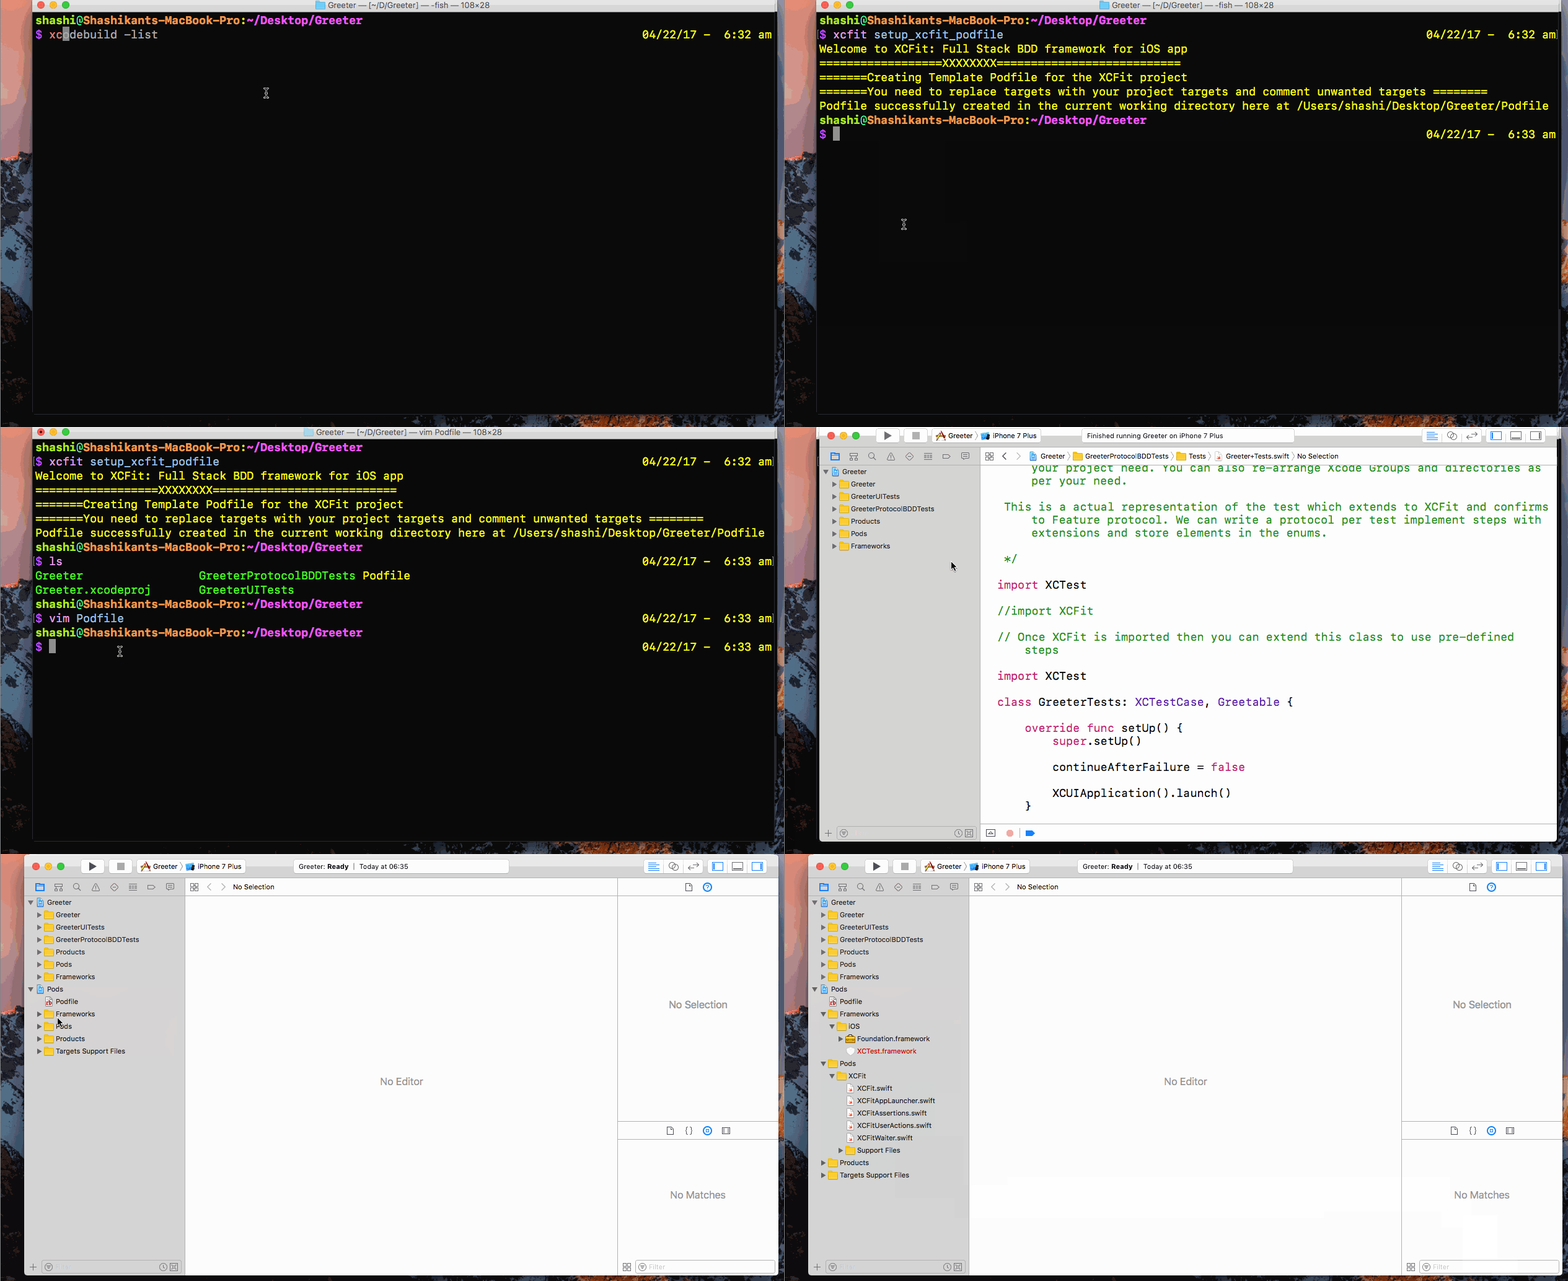
Now that, we have imported XCFit library. Let’s create new test in the GreeterProtocolBDDTests target to use XCFit pre-defined steps, we need to import ‘XCFit’ in the test as well as extend the test class to XCFit framework to use predefined steps.
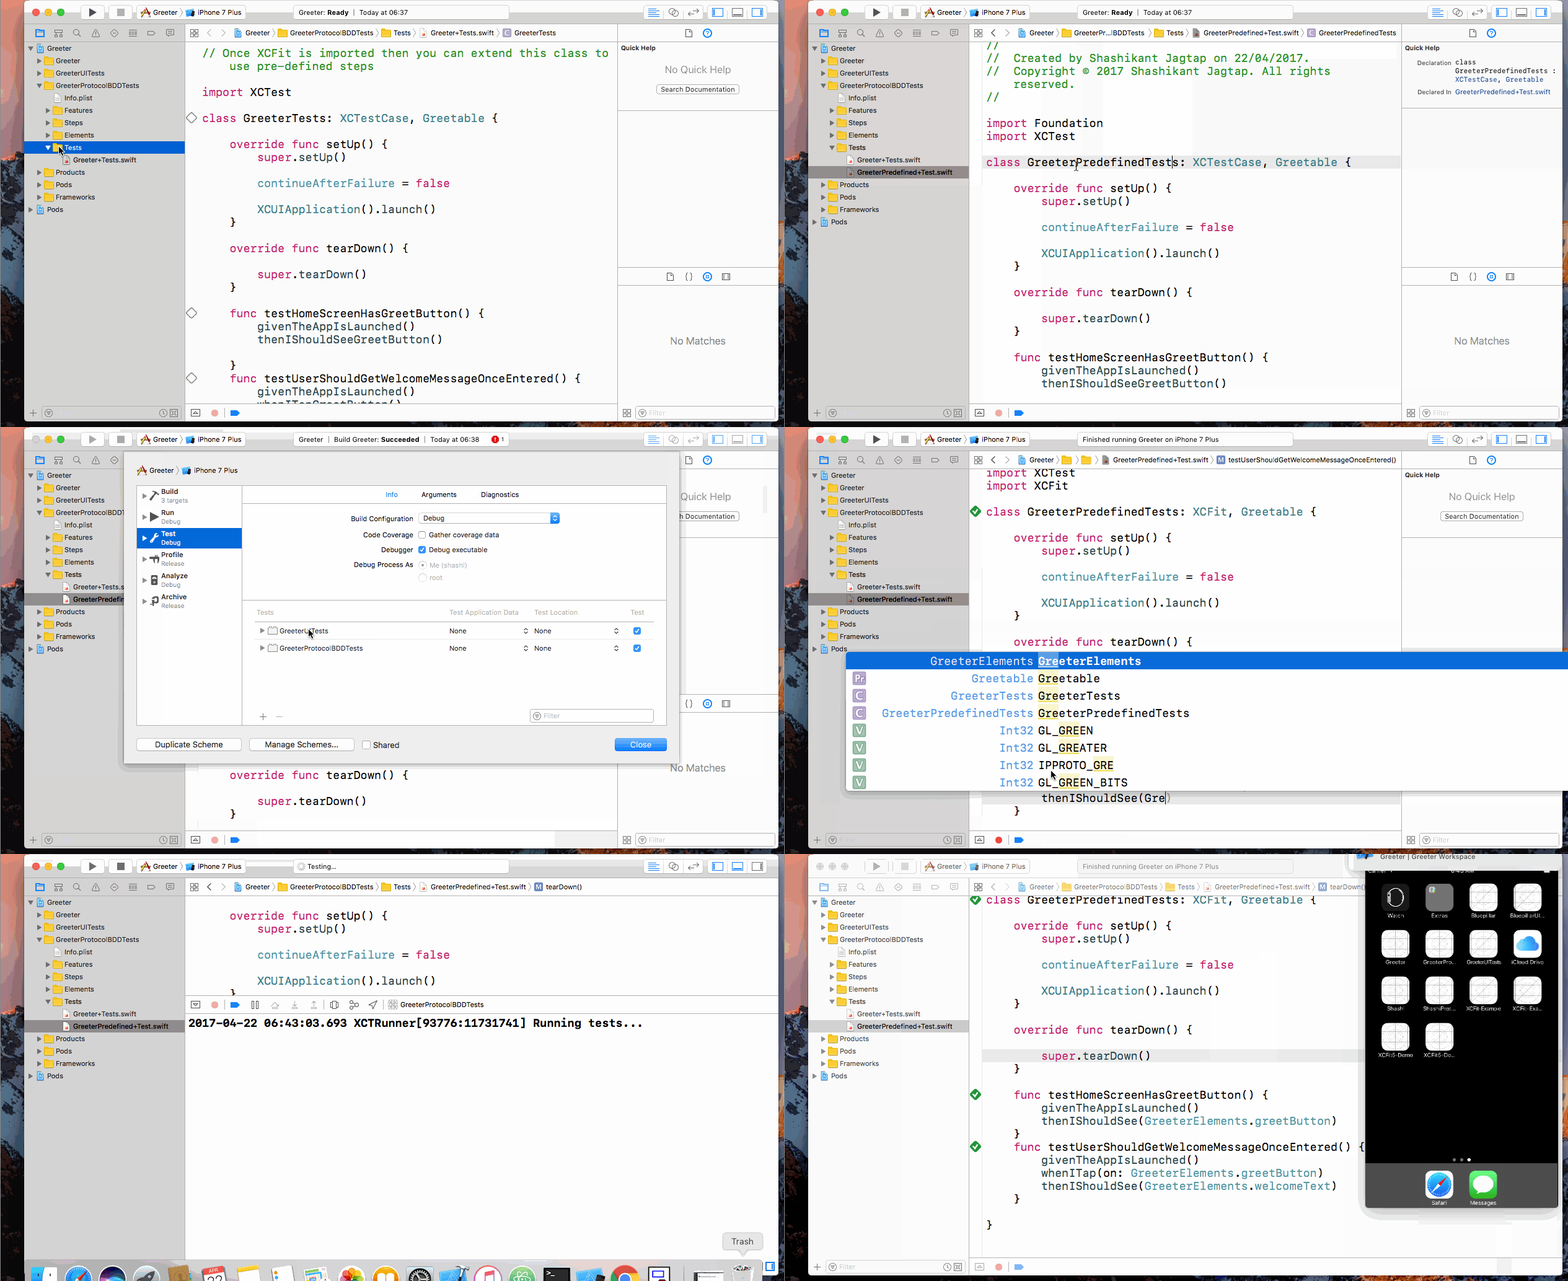
- Create a new Swift file inside Tests group call it as GreeterPredefinedTest.swift.
- Import the XCFit Framework and Extend the test class to XCFit as well as confirm to Greetable protocol.
- In the both test methods we can now use XCFit pre-defined steps so that our class looks like this:
|
1 2 3 4 5 6 7 8 9 10 11 12 13 14 15 16 17 18 19 20 21 22 23 24 25 26 |
import Foundation import XCTest import XCFit class GreeterPredefinedTests: XCFit, Greetable { override func setUp() { super.setUp() continueAfterFailure = false XCUIApplication().launch() } override func tearDown() { super.tearDown() } func testHomeScreenHasGreetButton() { givenTheAppIsLaunched() thenIShouldSee(GreeterElements.greetButton) } func testUserShouldGetWelcomeMessageOnceEntered() { givenTheAppIsLaunched() whenITap(on: GreeterElements.greetButton) thenIShouldSee(GreeterElements.welcomeText) } } |
Note that, we haven’t implemented single steps in the above class. There steps are coming from XCFit pre-defined steps, still our tests will pass.
Running Scenarios on CI Server
It’s not enough to run scenarios in the Xcode itself, we also need to script those scenarios so that it can be ran from command line or with any Continuous Integration server.
Install Fastlane
Fastlane is very popular open-source tool used for the automation of the iOS development task. Fastlane can be installed using Rubygems using the command
|
1 |
$ sudo gem install fastlane |
We can run the tests using Fastlane Scan however, we need to do little bit of setup including writing Fastfile and configuring scan options. It might be bit tricky for any iOS developer who doesn’t have Ruby programming knowledge. Thankfully XCFit provides template for setting up Fastfile for us.
Setup Fastlane using XCFit Template
XCFit has pre-defined template for the Fastfile with all the required configuration to run our BDD Scenario using Fastlane Scan . XCFit will setup Fastlane directory with Fastfile for us so that we don’t need to worry about setting from scratch.
|
1 |
$ xcfit setup_xcfit_fastfile |
This will create Fastfile with scan configuration. We need to replace the values for the constants like WORKSPACE, DESTINATION, XCFIT_SCHEME etc etc in the Fastfile then we should be able to run ‘xcfit’ lane.
|
1 |
$ faslane xcfit |
You can see the tests executing from command line.
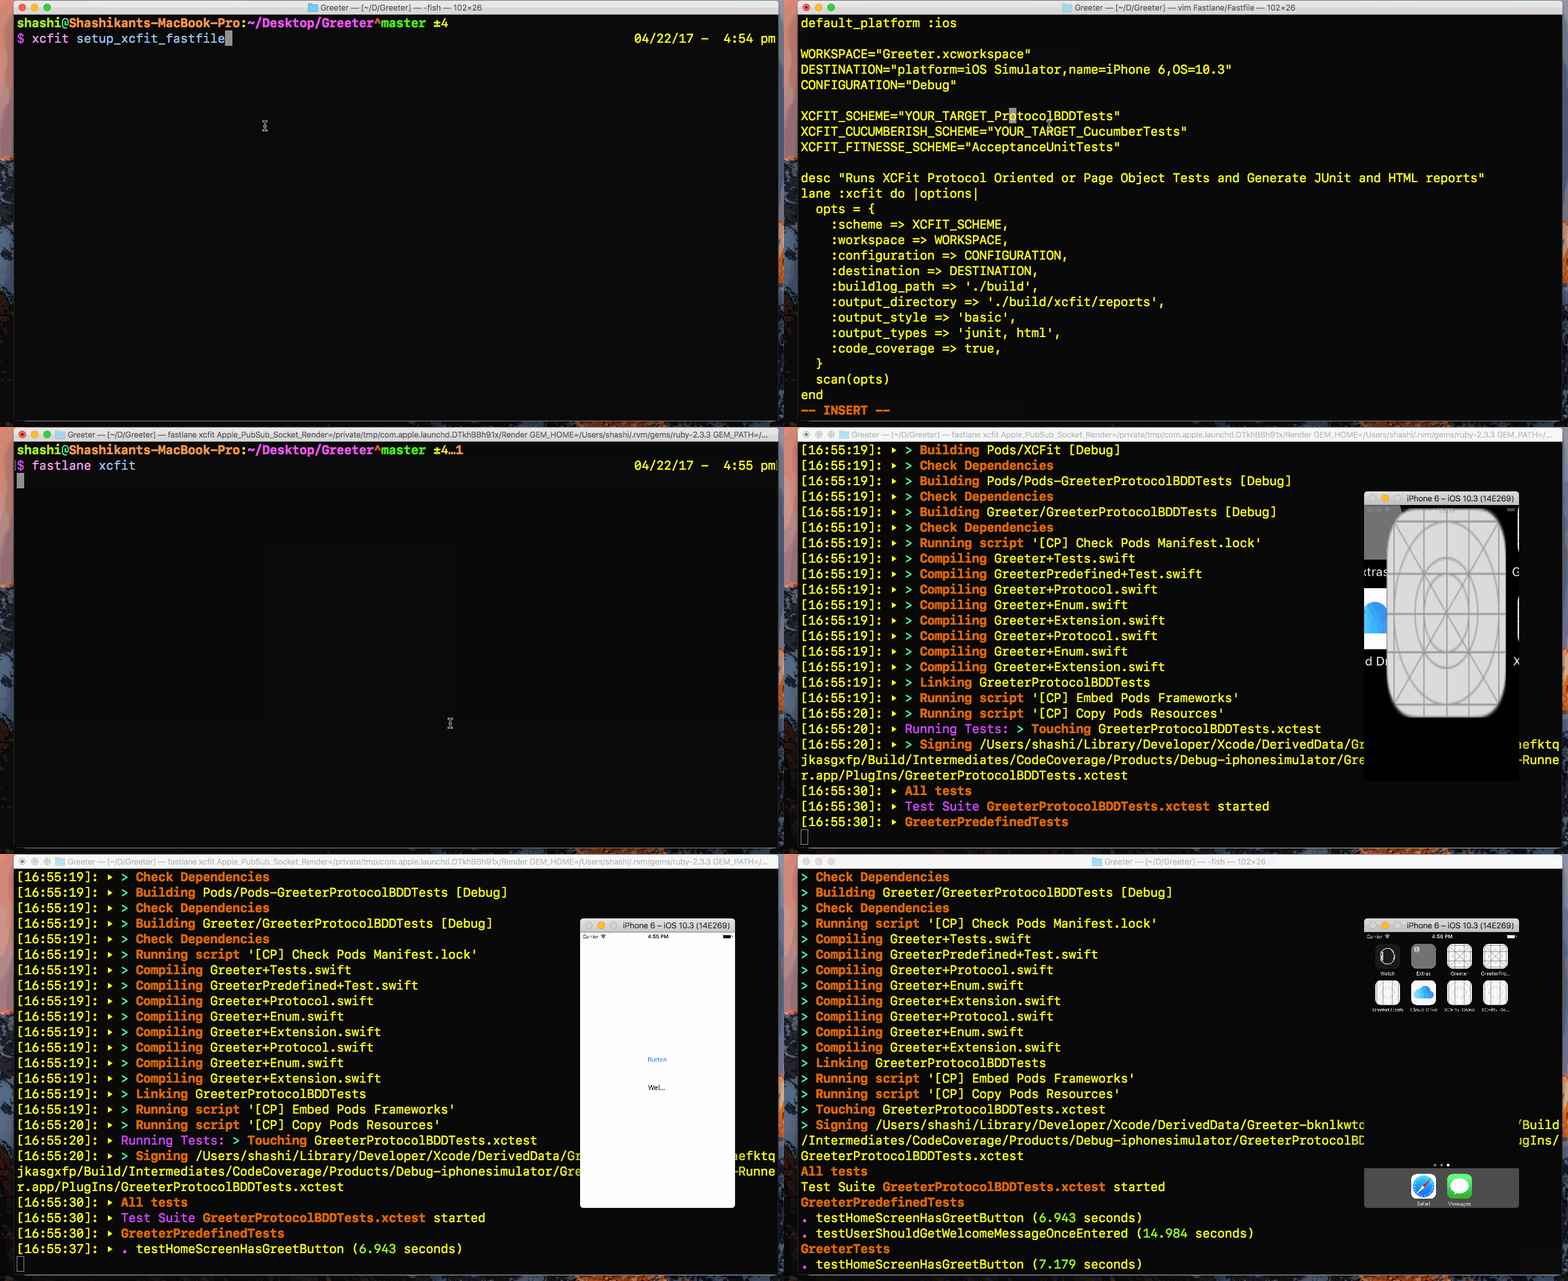
You can see that this lane is also creating reports in JUnit as well as HTML format for our test scenarios. It would super easy to plug this setup into any Continuous Integration server.
Benefits of Protocol Oriented BDD Approach
There are few benefits of doing Behaviour Driven Development using protocol-oriented approach which are as follows
- We can use native Swift Features like protocols, extensions, enumeration etc etc freely in the test code without any restrictions.
- We can use Apple’s own XCTest Framework to drive development without any third party libraries.
- We are not restricted to use Gherkin syntax. We can customise the language as we wanted
- We can re-use any step within our test target. We can avoid duplication using writing smart and reusable steps.
- We can get started with protocol-oriented BDD framework within few minutes using XCFit Xcode templates.
However, there are few caveats, you may find using BDD in protocol-oriented way but they are trivial.
- Because of limitation of XCTest, we can not parameterise the scenarios using different examples.
- We may not get feel of proper BDD as programmers not get notified for the unimplemented steps.
- The reporting of the scenario execution to non-technical people might be tricky.
Source Code On Github
You can find entire source code of this tutorial on Github repo – ProtocolOrientedBDD-Swift
You can clone the source code and execute the tests either using Xcode or using Fastlane.
|
1 2 |
$ git clone git@github.com:Shashikant86/ProtocolOrientedBDD-Swift.git $ fastlane xcfit |
Hope you will like this approach of development an apps using BDD in protocol-oriented way. This is my own idea of implementing it in protocol-oriented way so feel free to share your thoughts and suggest area where it can be improved. Look forward your replies in the comment below !

