

iOS Code Signing Tutorials
This is the final part of the iOS Code Signing tutorial series. This series covers fundamentals of the iOS code signing process. You can find all the posts in the series linked below
- iOS Code Signing: 1. Getting Started
- iOS Code Signing: 2. Certificate Signing Requests
- iOS Code Signing: 3. Certificates
- iOS Code Signing: 4. Provisioning Profiles
- iOS Code Signing: 5. Signing iOS App
*******************************************************
iOS Code Signing: Signing iOS App
As of now in this series, we have done the lot of groundwork in order to perform the actual code signing of the iOS apps. In previous posts, we have seen CSR, Certificates and Provisioning Profiles needed to code sign iOS apps. in this final post, we will focus on the actual code signing process. We will look into a digital signature, three main important stages of the code signing, the process of signing and verifying app with the codesign command line tool. So let’s get started.
Code Signing
Nowadays, with the latest version of the Xcode, all the code signing activities are handled by Xcode under the hood. We just need to specify the code signing identity and Xcode will manage everything for us. This approach is alright for development and distribution from the local machine because development team can rely on Xcode to handle all these task and apps can be released from the local Xcode machine. However, in the modern era of DevOps and Continuous Delivery, we can’t use local Xcode to ship applications. The applications have to be shipped from the Continuous Integration server. This arises the need for automating the builds and understanding the codesigning in details.
Apple has very comprehensive documentation on the entire code signing process here which explains most of the things. in this post, we will try to make use of that document to make it little bit practical with all the code signing activities. We have already created a demo app for codesigning and can be used to understand the actual code signing process.
We have already covered the benefits and limitations of the code signing in the introductory post. Code signing is performed after the building of the app is done. All the application including bundles, resources, frameworks, tools, scripts, libraries, plugins, Info.plist files, assets and all another sort of codes need to be code signed along with individual components of the apps.
Xcode uses codesign command line tool to sign the app one it’s built. We can use codesign tool to sign app without Xcode as well. The codesign tool is used to create and verify the code signature. In order to get more information about the various options and tasks that can be performed with codesign tool. Check out the Apple’s documentation here or simply type command man codesign to display detailed and latest information in the terminal.
Now let’s sign the example app using the codesign tool using the following command:
|
1 |
$ codesign -s "iPhone Developer: Shashikant Jagtap (MY_TEAMID)" ~/Library/Developer/Xcode/DerivedData/iOSCodeSigning-gakpslthucwluoakkipsycrwhnze/Build/Products/Debug-iphonesimulator/iOSCodeSigning.app/ |
This command will sign the components of the demo app. In this case, the app is already signed by Xcode so doesn’t need re-signing. Now we will see the what happened under the hood when the app is signed using the code signing identity.
Code Signing Stages
Code signing is macOS security technology and has following main stages while signing iOS apps.
- Seal
- Digital Signature
- Code Requirement
We will see each of these stages in details with practical example whenever applicable.
The Seal
In real life, we seal various objects in order to lock it so that it shouldn’t change. The good example is a letter in the sealed envelope guarantee that contents of the letter haven’t been changed since sender seals the envelope. A receiver is also sure that letter sent by sender hasn’t been modified or altered unless the seal is broken. It means seal ensure the seal ensure an integrity of the content. In the same way, seal in the code signing adds collections of hashes of the various part of the code so that verifier can detect if there are any changes in the code since the code has signed.
The code signing software, in our case, codesign generates seal by running a different part of the code in the app. It applies hashes to each an every part of the code using some sort of hashing algorithm. The hashes applied to the input blocks are unique. A verifier then uses the same hashing algorithm to compare the hashes, if all are same then it satisfies the verification criteria. The small change can result in the corruption of the hash. The hashes are applied to frameworks and all sort of the code. In the property list format. The typical hashing looks like this
|
1 2 3 4 5 6 7 8 9 10 11 |
<key>Frameworks/libswiftos.dylib</key> <dict> <key>hash</key> <data> dyKltMCMbq+pYDVJBtY78y7BuP0= </data> <key>hash2</key> <data> 6DxNIVZgqWfOeWfedGQ1+wOnIuA7vQlU+gVA0WhCiRw= </data> </dict> |
The verifier then uses the same hashing algorithm to verify that data hasn’t altered. However, this verification is only as reliable as the reliability of the stored hash. The digital signature guarantees the signing verification.
Digital Signature
The process of digital signature validates the authenticity and integrity of the message. Its based on public key cryptography, also known as asymmetric cryptography. In the code signing process, the software creates a digital signature by encrypting the seal’s hashes using signer’s private key. The signed hashes stored in the app along with the signer’s certificate represent the digital signature. We can then verify the code signature using the codesign tool by running following command
|
1 |
$ codesign -v --verbose=5 ~/Library/Developer/Xcode/DerivedData/iOSCodeSigning-gakpslthucwluoakkipsycrwhnze/Build/Products/Debug-iphonesimulator/iOSCodeSigning.app/ |
This should show an output something like this:

Even the small change in the code will invalidate the hash and report that signature is invalid. The software uses the same set if hashes and signer’s public key embedded in the certificate to decrypt the hashes. The verifier then compares the hashes and output the result.
The digital signature of a universal code is stored in the app binary itself while the signature of the frameworks, bundles, tools and other code is stored in the _CodeSignature/CodeResources within the bundle.
Code Requirements
There are some rules to evaluate the code signature. These rules are known as code requirements. Any app can enforce the code requirement that all the plug-ins used by App should be signed by the Apple. This prevents having the unauthorised third party software installed in the main app. The signer can also specify the code requirement as part of the code signature, these requirements are called as Internal Requirements. The Designated Requirements or DR tells the evaluating system how to identify the particular piece of code. There is detailed documentation of the Code requirement languages on Apple’s website here.
Now that, we have briefly covered the three stages of the code signing. Let’s print out the detailed information of our code signed demo app using the command.
|
1 |
$ codesign -d --verbose iOSCodeSigning.app/ |
This should print the all the codesigning details of our demo app. It looks like this:

As we can see there is a lot of information about the code signed the app. This shows the Executable path, identifier of the app and Signature of the app. As we have used development certificate and debug build, it’s showing Format of Mach-O thin binary. There are 14+7 hashes and 13 rules applied. As of now, there are no Internal Requirements specified with code signature.
Automatic Code Signing
Apple announced brand new code signing infrastructure at WWDC 2016 in the talk What’s New Xcode App Signing session. Apple announced automatic code signing in Xcode to reduce the code signing pain of iOS developers in Xcode 8 and onwards. In Xcode, we have the new setting in the General tab of build target to enable the automatic code signing. We just need to let Xcode know our development team and Xcode will handle all the code signing tasks like certificates, provisioning profiles etc automatically.
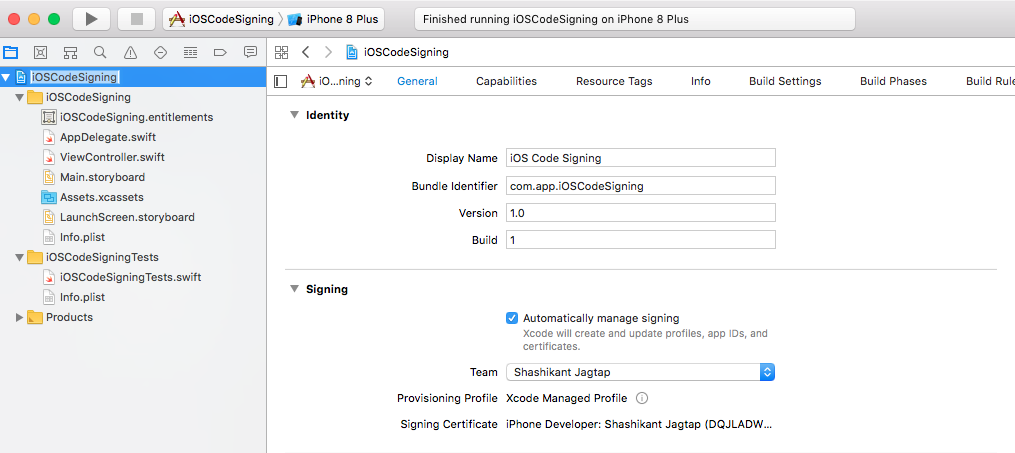
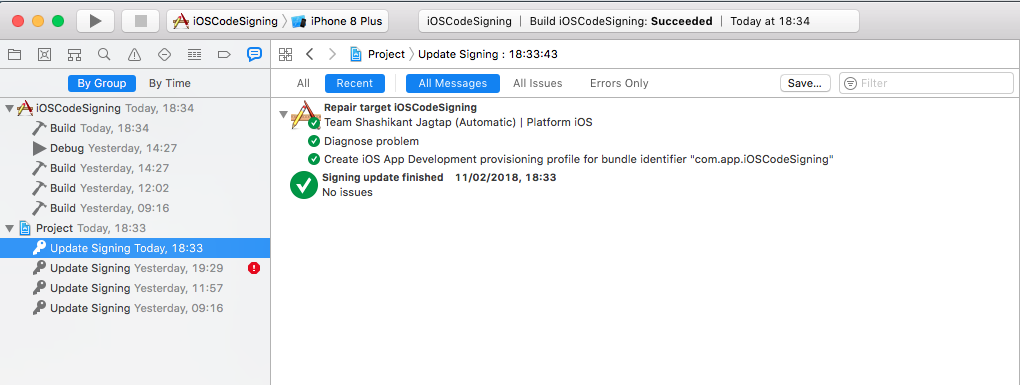
With the automatic signing, Xcode keeps an eye of any changes in the app setting like entitlement, the new device needs to register with profile etc. Once we give permission to register the device or new capabilities added Xcode creates a new provisioning profile and shows the code signing updates in the reports navigator section.
With Xcode 8, there ate two new build settings introduced to manage the code signing process. The build setting DEVELOPMENT_TEAM is used to provide greater control over the signing identity, It is mandatory and can not be left blank. The second build setting is PROVISINING_PROFILE_SPECIFIER which indicate the type of the signing method. This build setting only applicable for the automatic signing, in the manual signing PROVISIONING _PROFILE _SPECIFIER will not be used. We have to use CODE_SIGN_IDENTITY as generic entry such as “iPhone Developer”
Other important things to keep in mind about Automatic Code Signing are
- Archive created in Xcode through xcodebuild command line tool is signed with development certificate at first.
- When we specify the distribution method then archive is resigned with distribution code signing.
This means if you are using automatic signing on Continuous Integration servers then you must have development as well as distribution certificate on CI server.
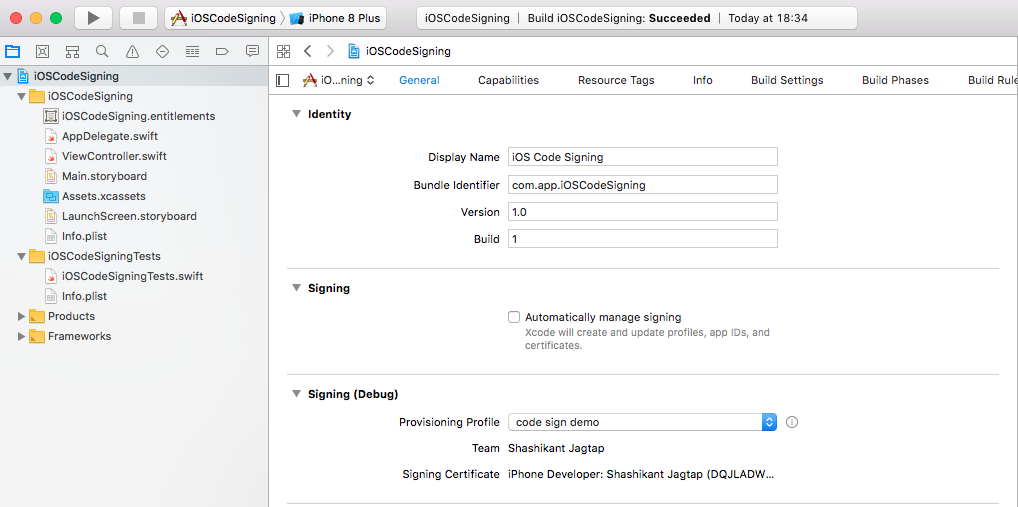
Manual Code Signing
In the process of manual code signing, we have to explicitly specify the code signing identity and provisioning profile in the build setting. The manual code signing can be enabled in Xcode 8+ by unchecking the “Automatically manage signing” checkbox from the General tab of the target setting. This will give the option to set up the code signing identity and provisioning profile on the General tab rather than going into the build setting.
You can read Apple’s guide on setting up manual signing here to know more about Xcode setup for manual signing. There is another change in the manual code signing that provisioning profiles are no longer set in the form of UDID, we can set using the name. Again When using manual code signing method, you will have to specify the values for the CODE_SIGN_IDENTITY and PROVISIONING_PROFILE build settings. Also, we need to have required certificates and provisioning profiles on the local machine from where we are building an app.
There is an awesome guide on code signing on Xcode 8, you can read here if you need more information about the manual and automatic signing.
Re-Signing iOS Apps
It’s very rare but in some situation, we need to remove the signature of the signed app and re-sign with the new profiles and certificates. This is absolutely possible with codesign tool. In order to re-sign iOS apps, we need to perform following steps.
- Find a signed .ipa file of app that needs resigning
- unzip it and remove code signature
|
1 2 |
$ unzip -q old.ipa $ rm -rf Payload/*.app/_CodeSignature |
- Replace old provisioning profile with the new provisioning profile that has been generated for resigning.
|
1 |
$ cp new_provisining_profile.mobileprovision Payload/*.app/embedded.mobileprovision |
- Generate entitlements for the current app using the old entitlements
|
1 2 3 4 |
$ cd Payload/ $ codesign -d --entitlements - *.app > entitlements.plist $ cd .. $ mv Payload/entitlements.plist entitlements.plist |
- Force sign the app with new certificate and entitlements
|
1 |
$ /usr/bin/codesign -f -s "Your_certificate_in Keychain" '--entitlements' 'entitlements.plist' Payload/*.app |
- Zip your resigned ipa file
|
1 |
$ zip -qr resigned.ipa Payload |
At this stage, you will have a binary signed with the new certificate and provisioning profile.
Now that, we have understood most of the basics of the iOS code signing process. If you have any questions, comments, feedback on these posts, feel free to reach out to me. tweet, email, comment or anything. At this point, we have to stop in the interesting journey of iOS coding signing in this series.
——————————-
If you have completed reading the entire series and you liked it then Tweet at me @Shashikant86 with message “Jai Maharashtra” so I know that someone has enjoyed my writing 🙂
References
This series wouldn’t be possible without these awesome resources
- Apple Documentation on Code Signing here
- https://www.objc.io/issues/17-security/inside-code-signing/
- https://vimeo.com/235055677
- https://possiblemobile.com/2016/06/code-signing-xcode-8/
- https://www.raywenderlich.com/2915/ios-code-signing-under-the-hood
- https://medium.com/ios-os-x-development/ios-code-signing-provisioning-in-a-nutshell-d5b247760bef
- https://codesigning.guide/
- https://pewpewthespells.com/blog/migrating_code_signing.html
Thanks a lot.