

Swift is getting popular programming language for developing iOS apps these days. Being a type safe language, it’s important to focus on code styling and conventions of the Swift code. SwiftLint is an open source tool to enforce Swift style and convention. SwiftLint allows us to enforce code style rules and stick to it during the development of iOS apps. There are various blog posts about integrating SwiftLint into the development process as well as SwiftLint itself has good documentation about its usage, however, there are some tricks we can use while integrating SwiftLint into Continuous Deployment pipelines. We will cover some of the tips for setting SwiftLint on CI server and embedding it into build pipeline. Note that, this post assumes that you have selected rules and configured .swiftlint.yml files. Let’s see how to integrate those rules on CI servers.
Note: Source Code for this post is available on Github SwiftLint-CI repo and TravisCI build is available here
1] Install SwiftLint with CocoaPods
There are four methods of installing SwiftLint as mentioned in the documentation. It’s important to select the method of installation on CI server as each of them has its own pros and cons.
Homebrew
SwiftLint can be easily installed using Homebrew package manager.
|
1 |
$ brew install swiftlint |
This seems to be the easiest method of installing SwiftLint on any CI server. Some of the cloud CI servers like TravisCI has SwiftLint pre-installed in the macOS images. There are some pros and cons of this method of installation
Pros
- Easy to install with one command
- Some Cloud CI servers has pre-installed version of SwiftLint using Homebrew
- No need to make any changes in the application code
- A script can run independently on CI server without making any changes in Xcode project.
Cons
- Homebrew installs the latest version of SwiftLint every time we run $ brew install swiftlint command. It’s hard to go back to previous versions if needed.
- There might be a different version of SwiftLint running on the local machine and CI server. The team need to stick to the version of SwiftLint installed on CI server. e.g TravisCI has SwiftLint version 0.17.0 installed in xcode 8.3 macOS image. The latest version of SwiftLint at the time writing this post is swiftlint 0.21.0 it’s bit hard to go back to old version using Homebrew
CocoaPods
SwiftLint can also be used as CocoaPods, there are detailed documentations how to install SwiftLint using CocoaPods here but in summary, we need to get the SwiftLint pod by adding pod 'SwiftLint' into Podfile and install SwiftLint using pod install command. This will create executable binary inside ./Pods/SwiftLint/swiftlint which can be added to build phases of the target. This is recommended the approach of installation in the SwiftLint readme file but it also has some pros and cons. Still, the CocoaPods is the best way to install SwiftLint on CI server.
Pros
- We can install a specific version of SwiftLint rather than simply the latest
- Versions are locked inside Podfile.lock file so everyone in the team will be using the same version of SwiftLint including CI.
- We can execute SwiftLint using binary located at ./Pods/SwiftLint/swiftlint
Cons
- We have to add another dependency in our application source code
- It will add dependencies and binaries inside Pods/ directory which needs to be checked into the SCM.
There are other methods of SwftLint installation like compiling from source and download pre-built package are available there but compiling from source isn’t a good idea at all. Some users found the downloading pre-built package is faster on CI. We can download and install the package using the following command.
|
1 2 |
$ wget --output-document /tmp/SwiftLint.pkg https://github.com/realm/SwiftLint/releases/download/0.21.0/SwiftLint.pkg $ sudo installer -pkg /tmp/SwiftLint.pkg -target / |
The best idea is to pick the CocoaPods way of installing SwiftLint.
2] Succinct Podfile
SwiftLint can be used to lint multiple targets of an iOS app by using a simple Ruby technique, we can apply SwiftLint to multiple targets. We can write Podfile like this
|
1 2 3 4 5 6 7 8 |
targets_to_lint = ["SwiftLint-CI", "SwiftLint-CITests", "SwiftLint-CIUITests"] targets_to_lint.each do |target| target "#{target}" do use_frameworks! pod 'SwiftLint' end end |
This will apply SwiftLint for all the targets mentioned in the targets_to_lint array once we run pod install command.

3] Run Early & Independently on CI
SwiftLint being a static analysis tool, we have to run linting before running any other development task like building, testing or archiving. This will help us to fail early if there are some issues in code quality. We can have separate build phase in our CI pipeline to run the static analysis with SwiftLint. The script we want to run is
|
1 |
$ ./Pods/SwiftLint/swiftlint |
This makes sure that correct SwiftLint binary is getting executed as part of the build script rather than executing the pre-installed binary. In our example app, we have configured separate phase for SwiftLint. Check out the .travis.yml
4] Balance Local and CI Linting
The iOS developers mostly work with Xcode, however, CI servers have to run some automated scripts on the server to run the development tasks. In order to make both developers and CI happy, we need to find balance how to run SwiftLint without making them upset. There are a couple of things, we can focus on while development and CI phase like Xcode build phases and reporting of SwiftLint results.
Smart Build Phases
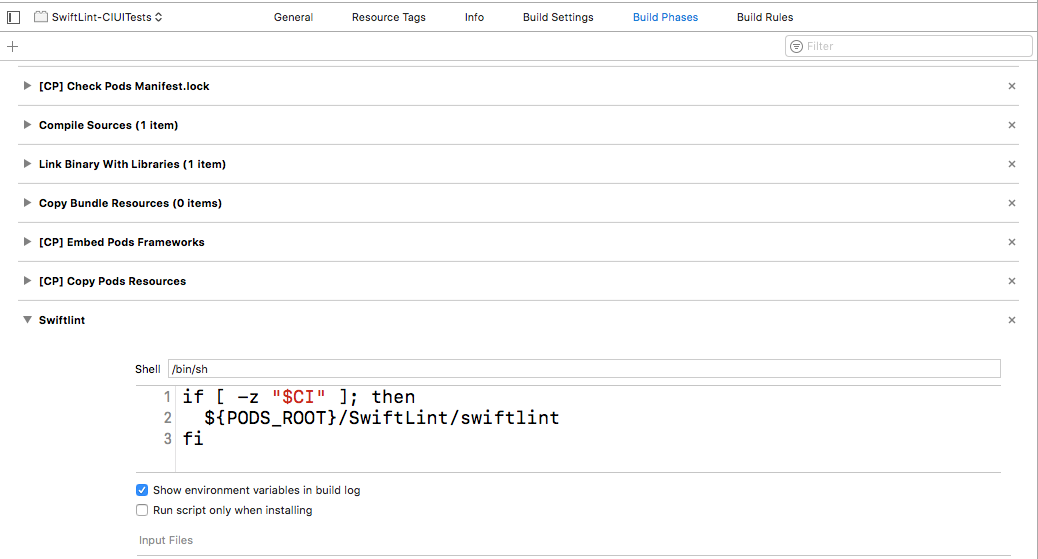
SwiftLint works perfectly when run from command line however, iOS developers would love to integrate it with Xcode. In order to integrate it with Xcode, we need to add run SwiftLint as part of build phase of the targets but we don’t want to repeat the execution for each build on CI. We can add run script in the build phase smartly so that we can still run the SwiftLint from local Xcode as well as on CI. We can achieve it by creating CI environmental variable (most CI server has this similar variable already set) and adding conditional execution script in the build phases of the target.
|
1 2 3 |
if [ -z "$CI" ]; then ${PODS_ROOT}/SwiftLint/swiftlint fi |
This will make sure that there won’t be repeated execution of swiftlint script on CI server but developers can still run it from local Xcode.
Smart Reporting
SwiftLint has different reporting types including xcode, json, csv, checkstyle, junit, html and emoji. The default reporter type is ‘xcode’. It’s a good idea to keep the xcode reporting for the local execution and gnerate fancy reports using html or junit on CI server. We can change the reporter style using
|
1 |
./Pods/SwiftLint/swiftlint --reporter junit |
5] Mind the Fastlane
Fastlane has become a very popular tool to automate iOS development tasks for continuous deployment. Fastlane comes with various tools and actions to perform the specific task. Fastlane has an action for SwiftLint which looks great but it’s not required to execute SwiftLint as Fastlane action. If we using SwiftLint with CocoaPods, then actions must set an executable parameter, pointing to the binary located at ./Pods/SwiftLint/swiftlint path. Otherwise, Fastlane will pick default binary if there is any. The SwiftLint Fastlane config should look like
|
1 2 3 4 5 |
swiftlint( mode: :lint, output_file: "swiftlint.result.json", executable: "./Pods/SwiftLint/swiftlint" ) |
This will make sure that we are executing correct binary of SwiftLint with Fastlane.
What Next
Now that, we have seen some tips to configure SwiftLint on CI server. In the next post, we will see step by step guide to setup SwiftLint on TravisCI build stages for iOS.